Leveling a concrete sidewalk is essential for maintaining safety and aesthetics. Uneven sidewalks can cause tripping hazards and detract from the curb appeal of your home. By learning how to level concrete sidewalk, you can ensure a smooth, durable surface that stands the test of time. This guide will walk you through the process step-by-step, making it easy for anyone to follow. Whether you’re tackling small cracks or significant unevenness, we’ve got you covered with practical tips and advice.
Table of Contents
The Basics of Concrete Leveling
Concrete leveling might seem like just filling in the dips and smoothing out the bumps, but there’s a bit more to it. It’s about restoring balance and safety to your walkways, ensuring everyone can stroll along without a stumble. Whether you’re dealing with a slight unevenness or a major tripping hazard, understanding the basics sets the stage for a solid, long-lasting fix.
What Causes Uneven Sidewalks?
Sidewalks don’t just start tilting or cracking out of the blue. Here’s a closer look at what’s usually behind the scenes:
- Soil Erosion: Picture this—rainwater or your sprinkler system is constantly at work, slowly washing away the soil underneath the sidewalk. Over time, this causes the slabs to sink unevenly. It’s like pulling a rug out from under someone, but in slow motion!
- Weather Conditions: Concrete is tough, but it’s not immune to the whims of Mother Nature. As temperatures swing from hot to cold, concrete expands and contracts. This movement can lead to cracks or unevenness, especially if the initial installation didn’t take these cycles into account.
- Poor Installation: Let’s be honest—sometimes the job isn’t done right from the start. If the foundation wasn’t prepared correctly, or the concrete mix was off, you’re likely to see problems down the road. It’s like baking a cake with the wrong measurements—things won’t turn out as expected!
With this knowledge in hand, we’re well-equipped to dive into the nitty-gritty of preparing for a concrete leveling project. Next, we’ll explore the essential tools and materials needed to ensure your sidewalk returns to its prime condition.
Preparing for the Leveling Process
Before diving into the actual leveling, it’s crucial to ensure you’re fully prepared. This involves gathering the right tools and materials and understanding the necessary safety precautions.
Tools and Materials Needed
To level your concrete sidewalk effectively, you’ll need a few essential tools and materials. Here’s a comprehensive list of what you should have on hand:
1. Concrete Mix:
This is the star of the show. You’ll need a high-quality concrete mix designed for patching and leveling. Look for a mix that’s specifically labeled for sidewalk repair or resurfacing. Make sure to read the instructions on the bag to know how much water to add and how long it takes to set. For small repairs, you might use a pre-mixed bag, but for larger areas, you might need to mix the concrete yourself using a concrete mixer.
2. Trowels:
These handy tools are used for spreading and smoothing the concrete. You’ll want a variety of sizes, including:
- A large flat trowel for spreading the concrete evenly across the surface.
- A smaller, pointed trowel for detailed work around the edges and in tight spots.
- A finishing trowel to give the surface a smooth finish.
3. Level:
A good level is essential to ensure that your sidewalk is perfectly flat. You can use:
- A standard carpenter’s level for basic leveling tasks.
- A laser level for more precise work, especially over longer distances. A laser level helps ensure that the entire length of the sidewalk is consistently level.
4. Measuring Tools:
These include measuring tapes and rulers to ensure accurate measurements of the area you are leveling and the amount of concrete mix you need.
5. Buckets and Mixing Tools:
You’ll need buckets to carry water and mix the concrete. For mixing, a mixing hoe or a power mixer attachment for your drill can make the job easier and more consistent.
6. Brushes and Brooms:
A stiff brush to clean the surface before you start and a soft broom to give the finished surface a light texture, which can help prevent slips.
7. Edge Sealer:
To protect the newly leveled surface and extend its lifespan, an edge sealer can be applied after the concrete has cured.
Having these tools ready will set you up for a smooth and efficient leveling process. But having the right tools is only half the battle; you also need to keep safety in mind.
Safety Precautions
Safety should always be your top priority when working with concrete. Here are some key precautions to keep in mind:
Wear Protective Gear:
Concrete can be harsh on your skin and eyes. Make sure to wear:
- Gloves to protect your hands from abrasive concrete mix and chemical burns.
- Safety glasses or goggles to prevent dust and debris from getting into your eyes.
- Long sleeves and pants to protect your skin from splashes.
- A dust mask if you’re working in a dusty environment or mixing dry concrete to avoid inhaling harmful particles.
Work in a Well-Ventilated Area:
If you’re mixing concrete indoors or in a confined space, make sure there’s good ventilation to avoid inhaling any harmful dust or fumes. Open windows and use fans if necessary.
Be Cautious with Heavy Lifting:
Bags of concrete mix are heavy. Here are some tips to avoid injuries:
- Lift with your legs, not your back. Bend your knees and keep your back straight.
- If a bag is too heavy, don’t hesitate to ask for help or use a wheelbarrow to transport it.
- Break up larger tasks into smaller, manageable steps to avoid overexertion.
Keep the Area Clear:
Make sure the work area is clear of any obstacles or debris that could cause you to trip or fall. This includes:
- Removing any loose stones, sticks, or tools from the work area.
- Keeping children and pets away from the worksite for their safety.
- Setting up a designated area for tools and materials to keep everything organized.
Follow Manufacturer’s Instructions:
Always read and follow the instructions on the concrete mix and any other products you’re using. This includes:
- Mixing ratios for water and concrete.
- Setting and curing times.
- Application techniques and temperature recommendations.
By following these safety tips and having the right tools on hand, you’re setting yourself up for a successful concrete leveling project.
Next, we’ll dive into the detailed steps of how to level your concrete sidewalk effectively. Stay tuned as we guide you through each step to ensure a smooth and level surface.
Transform your walkway with our expert general contracting services, specializing in concrete sidewalks.
Step-by-Step Guide to Leveling Concrete
Now that you’re equipped with the right tools and safety knowledge, it’s time to get into the nitty-gritty of leveling your concrete sidewalk. Let’s break it down into manageable steps:
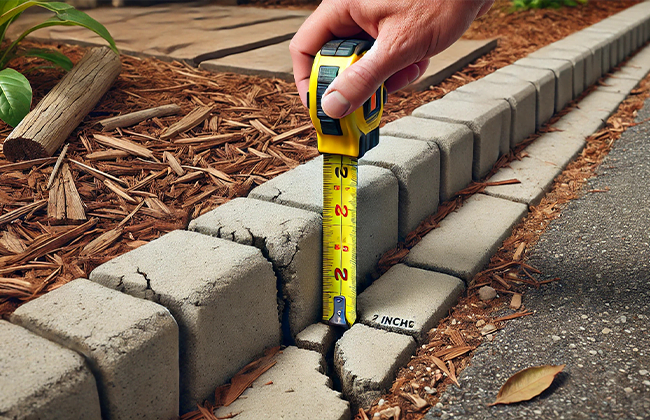
Step 1: Assessing the Damage
First things first, you need to figure out exactly what you’re dealing with. Take a close look at your sidewalk to determine the extent of the unevenness and damage. Here’s what you should do:
- Measure the Dip or Rise: Use a level to measure how much the sidewalk has sunk or risen. This will help you understand how much leveling compound you’ll need.
- Check for Cracks: Look for any cracks or breaks in the concrete. Small cracks can be filled during the leveling process, but larger cracks might need additional repair.
- Identify the Cause: Try to figure out why the sidewalk is uneven. Is it due to soil erosion, tree roots, or poor installation? Understanding the cause can help prevent future issues.
By assessing the damage thoroughly, you’ll have a clear plan for how to proceed.
Step 2: Cleaning the Area
A clean surface is crucial for the new concrete to bond properly. Here’s how to prep your sidewalk:
- Remove Debris: Clear away any loose debris, such as dirt, leaves, or small stones, using a broom or a brush.
- Wash the Surface: Use a pressure washer or a garden hose to wash the sidewalk. Make sure to remove all dirt and grime. A clean surface ensures that the concrete leveler adheres properly.
- Let It Dry: Allow the sidewalk to dry completely before moving on to the next step. Wet surfaces can prevent the new concrete from sticking properly.
Step 3: Mixing and Applying Concrete Leveler
Now comes the fun part—mixing and applying the concrete leveler. Follow these steps:
- Mix the Concrete Leveler: Follow the instructions on the concrete mix package. Typically, you’ll add water to the dry mix and stir until you achieve a smooth, lump-free consistency. Use a mixing paddle attached to a drill for a more consistent mix.
- Pour the Leveler: Start pouring the concrete leveler into the low areas of the sidewalk. Use a large trowel to spread it evenly. Make sure to work quickly, as the leveler can start to set within a few minutes.
- Fill Cracks: If there are any small cracks, use a smaller trowel to push the leveler into the cracks. This will help create a smooth, continuous surface.
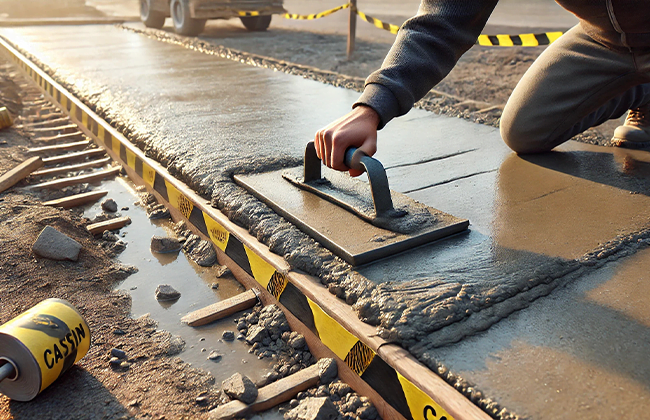
Step 4: Smoothing and Finishing
After applying the concrete leveler, it’s time to smooth and finish the surface:
- Smooth the Surface: Use a long, flat trowel or a straightedge to smooth out the surface. Work in a back-and-forth motion to ensure the leveler is spread evenly.
- Check the Level: Use your level to check that the surface is even. Adjust as necessary by adding more leveler or smoothing out high spots.
- Texture the Surface: If desired, use a soft broom to lightly brush the surface. This creates a non-slip texture, which is especially useful for outdoor walkways.
Step 5: Curing the Concrete
The final step is allowing the concrete to cure properly:
- Let It Set: Allow the concrete to set for the recommended time, usually 24-48 hours. During this time, keep the area clear of foot traffic and avoid any water exposure.
- Apply Sealer: Once the concrete is fully cured, apply a concrete sealer to protect the surface from weather and wear. Follow the sealer’s instructions for the best results.
By following these steps, you can achieve a level, safe, and visually appealing sidewalk.
Next, let’s discuss how to maintain your newly leveled sidewalk to ensure it lasts for years to come.
Maintaining Your Sidewalk
Once you’ve leveled your sidewalk, it’s important to keep it in good shape to prevent future issues. Regular maintenance can save you time and money in the long run. Here’s how to keep your sidewalk looking great and staying safe.
Regular Inspection and Maintenance Tips
Regular inspections are crucial for spotting potential problems early. Here’s what you should do:
- Monthly Walkthroughs: Take a stroll along your sidewalk every month to check for any new cracks or uneven spots. Catching issues early means you can address them before they become bigger problems.
- Clean the Surface: Keep your sidewalk clean by sweeping away debris, leaves, and dirt. Use a garden hose or pressure washer to give it a good wash every few months. A clean sidewalk not only looks better but also makes it easier to spot any damage.
- Seal the Concrete: Applying a concrete sealer every few years can protect your sidewalk from water, ice, and other elements. Sealers help prevent cracks and keep the surface looking new. Make sure to follow the manufacturer’s instructions for the best results.
- Watch for Water Pools: After a rain, check for areas where water tends to pool. Standing water can lead to erosion and damage the concrete. If you notice any pooling, consider adjusting the landscaping or adding drainage to direct water away from the sidewalk.
- Trim Nearby Plants: Tree roots and plants growing near your sidewalk can cause cracks and lifting. Keep plants trimmed and consider installing root barriers if trees are too close to the concrete.
When to Call a Professional
Sometimes, despite your best efforts, you might need to bring in the experts. Here are situations when it’s best to call a professional:
- Major Cracks or Shifting: If you notice large cracks or if a section of your sidewalk is significantly higher or lower than the rest, it’s time to get professional help. These issues might be beyond simple DIY fixes and could require specialized tools and skills.
- Recurrent Issues: If you keep fixing the same problem and it keeps coming back, a professional can identify the underlying cause and provide a long-term solution.
- Complex Repairs: If the repair requires advanced techniques like mudjacking or using polyurethane foam, it’s best to leave it to the pros. These methods can be tricky and require specific expertise.
- Safety Concerns: If your sidewalk poses a significant tripping hazard, don’t wait to get it fixed. A professional can ensure the repair is done quickly and safely, minimizing the risk of accidents.
By regularly inspecting and maintaining your sidewalk, you can extend its lifespan and keep it safe for everyone. However, knowing when to call a professional can save you from costly mistakes and ensure a lasting fix.
Next, we’ll discuss the cost considerations and how to budget for your sidewalk repair to make the process as smooth and affordable as possible.
Transform your walkway with our expert general contracting services, specializing in concrete sidewalks.
Cost Considerations and Budgeting
When it comes to leveling your concrete sidewalk, understanding the costs involved can help you make informed decisions and avoid any financial surprises. Whether you’re doing it yourself or hiring a professional, it’s important to budget appropriately. Let’s break down the cost considerations and some tips for budgeting your sidewalk repair.
DIY vs. Professional Costs
Deciding between a DIY approach and hiring a professional largely depends on the scope of the project, your skill level, and your budget. Here’s a comparison to help you weigh your options:
DIY Costs:
- Materials: The primary expenses for a DIY project include the concrete mix, trowels, a level, and other essential tools. A bag of concrete mix costs around $10-$15, and you might need several depending on the size of the area you’re leveling. Trowels and levels are one-time purchases, usually ranging from $10 to $50 each.
- Additional Supplies: Buckets, mixing tools, and brushes are relatively inexpensive, adding another $20-$30 to your total cost.
- Time and Labor: Your time is valuable. DIY projects can be time-consuming, and you’ll need to consider the time spent on preparation, leveling, and curing.
- Hidden Costs: Mistakes can be costly. Incorrect mixing or application might lead to additional repairs down the line.
Professional Costs:
- Labor Fees: Hiring a professional can cost anywhere from $300 to $1,000, depending on the size and complexity of the job. Labor costs cover the expertise and efficiency a professional brings to the table.
- Materials Included: Professionals usually include the cost of materials in their quotes, which can simplify budgeting for you.
- Quality Assurance: Professionals offer a level of assurance in terms of quality and longevity of the repair, potentially saving you money in future repairs.
Tips for Budgeting Your Sidewalk Repair
Proper budgeting ensures that your sidewalk leveling project stays within financial limits without compromising on quality. Here are some tips to help you budget effectively:
- Get Multiple Quotes: If you decide to hire a professional, don’t settle for the first quote you receive. Get at least three quotes from different contractors to compare prices and services. This will give you a better understanding of the going rate and help you make an informed decision.
- Plan for Contingencies: Always budget for unexpected expenses. It’s wise to set aside an additional 10-20% of your total budget to cover any unforeseen costs, such as extra materials or unanticipated repairs.
- Buy in Bulk: For DIY projects, consider buying materials in bulk if you have a large area to cover. Bulk purchases can often come with discounts, saving you money in the long run.
- Rent Tools: If you don’t already own the necessary tools and don’t see yourself using them frequently, consider renting rather than buying. Tool rental shops offer a wide range of equipment at affordable daily rates.
- Do Some Prep Work Yourself: Even if you hire a professional, you can reduce costs by doing some of the prep work yourself. Clearing debris and cleaning the area can save time for the contractor, which might reduce labor costs.
- Check for Local Grants or Assistance: Some local governments offer grants or financial assistance for home repairs, including sidewalk maintenance. It’s worth checking with your local municipality to see if you qualify for any programs.
By understanding the cost implications and planning your budget carefully, you can ensure that your sidewalk leveling project is both affordable and successful.
Conclusion
Leveling your concrete sidewalk is a practical way to enhance safety and appearance. By following the steps outlined in this guide, you can tackle the project with confidence. Remember to regularly inspect and maintain your sidewalk to prevent future issues. If you prefer professional assistance to level concrete sidewalk, don’t hesitate to reach out. Contact us at (+1) 917-355-8556 for expert help.
FAQs
Q: How to level concrete sidewalk with minimal tools?
A: To level a concrete sidewalk with minimal tools, you’ll need a concrete mix, a trowel, and a level. Clean the area thoroughly, apply the concrete mix, and use the trowel and level to smooth it out.
Q: Can I level concrete sidewalk myself, or should I hire a professional?
A: You can level a concrete sidewalk yourself if the unevenness is minor. For extensive damage or if you’re unsure, it’s best to hire a professional for a long-lasting solution.
Q: What are the common causes that make it necessary to level concrete sidewalks?
A: Common causes include soil erosion, weather conditions, and poor initial installation. Addressing these issues promptly can prevent further damage and maintain a safe walking surface.
Q: How often should I check if I need to level concrete sidewalk?
A: Regular inspections, at least once a year, are recommended. Look for signs of cracks, unevenness, and any areas where water pools after rain. Early detection can save time and money.
Q: What materials do I need to level concrete sidewalks effectively?
A: Essential materials include a high-quality concrete mix, trowels, a level, and possibly a concrete sealer. Having the right materials ensures a smooth and durable repair.
Q: How to level an uneven concrete sidewalk?
A: To level an uneven concrete sidewalk, clean the area thoroughly, apply a concrete leveler, and use a trowel to smooth the surface evenly.
Q: Can you pour self-leveling concrete over existing concrete?
A: Yes, you can pour self-leveling concrete over existing concrete. Ensure the surface is clean and primed for the best adhesion.
Q: What is the easiest way to level concrete?
A: The easiest way to level concrete is to use a self-leveling compound. Pour it over the cleaned surface, and it will spread out evenly on its own.
Q: How to re-level a concrete walkway?
A: Relevel a concrete walkway by filling low spots with a concrete mix, smoothing it with a trowel, and ensuring it aligns with the surrounding surface.
Q: How to level concrete sidewalk by hand?
A: To level a concrete sidewalk by hand, use a trowel to spread the concrete mix evenly, checking with a level to ensure the surface is flat.
Q: How to raise the sidewalk with foam?
A: Raise a sidewalk with foam by injecting polyurethane foam under the slab. The foam expands, lifting and leveling the sidewalk.
Q: How do you level uneven outdoor concrete?
A: Level uneven outdoor concrete by applying a concrete leveler, using a trowel to spread it, and ensuring it’s smooth and even with a level.
Q: What is the best way to fix uneven concrete?
A: The best way to fix uneven concrete is to use a self-leveling compound, which fills in low areas and creates a smooth, level surface.
Q: How do you fix a sloping concrete sidewalk?
A: Fix a sloping concrete sidewalk by applying a concrete leveler to the low side, smoothing it with a trowel, and checking the slope with a level.
Transform your walkway with our expert general contracting services, specializing in concrete sidewalks.

