Are you looking to transform your outdoor space with a fresh paved area? Learning how to lay pavers is an essential skill that can revitalize your garden, driveway, or patio. Whether you’re contemplating a new walkway or wanting to upgrade an old patio, understanding the proper techniques for laying pavers will ensure a durable and aesthetically pleasing result. This guide will walk you through everything from choosing the right materials to the final touches, helping you to lay pavers like a pro.
Table of Contents
What You Need to Know Before Starting
Before you get your hands dirty, it’s crucial to lay the groundwork properly. Starting on the right foot with a clear understanding of the process, necessary materials, and planning steps can make the difference between a project that’s a pleasure and one that’s a pain. Let’s make sure you’re set up for success with everything in place to bring your vision to life.
Materials Needed
So, you’re ready to transform that backyard or driveway? Fantastic! Here’s what you’ll need to ensure a smooth installation:
- Pavers: Available in a variety of materials such as concrete, brick, or natural stone, each offering different aesthetics and price points.
- Paver Base: Typically made of crushed stone or gravel, this forms the foundation of your project.
- Paver Sand: A fine sand used for leveling and stabilizing your pavers once laid.
- Edging Stones or Paver Edging: These are crucial as they hold the pavers in place.
- Landscape Fabric: This is optional but recommended to prevent weed growth under your pavers.
- Tools: The essentials include a shovel, tape measure, rubber mallet, level, and a power saw for cutting pavers.
It’s wise to source these materials early. Knowing what you need allows you to budget effectively and avoid project delays.
Planning Your Project
Proper planning isn’t just a preliminary step; it’s the backbone of your paving success. Here’s how to ensure everything runs smoothly:
- Measure Your Space: Getting the dimensions right is crucial. This determines how many pavers and how much base material and sand you’ll need.
- Sketch Your Design: Putting your plan on paper helps visualize the project and serves as a guide throughout the process.
- Check for Utilities: Always check for underground utilities before digging to avoid disruptions and accidents.
- Prepare the Site: This involves clearing the area of any grass, rocks, and other debris. Also, plan for water runoff by ensuring a slight slope away from structures.
- Order Materials: With your measurements and design in hand, order your materials. It’s a good practice to order a bit more than you calculated to cover any unexpected needs.
Thorough planning not only prepares you for the actual laying of the pavers but also anticipates and mitigates potential hurdles.
As you finalize your preparations, keep your tools and materials organized for easy access. Up next, we dive into the nitty-gritty of laying the pavers with our comprehensive step-by-step guide. Stay tuned and get ready to see your space transformed!
Step-by-Step Guide to Laying Pavers
Laying pavers might seem like a daunting task, but with the right approach, it becomes an enjoyable project that transforms your space. Whether you’re enhancing a driveway, creating a quaint walkway, or assembling a stunning patio, the process involves similar steps that ensure a beautiful and lasting outcome. Let’s break it down into detailed steps, ensuring you build on a solid foundation and finish with finesse.
Preparing the Base
A sturdy base is crucial for the longevity of your pavers. Here’s how to establish a solid foundation:
- Clear and Excavate: Remove any vegetation and dig out the soil to a depth of about 7-8 inches to accommodate the base material and pavers.
- Level and Compact: After digging, level the area with a rake and compact the soil with a plate compactor to create a stable ground.
- Add Base Material: Spread a layer of crushed gravel, about 4-5 inches thick, then compact it to provide a strong, even base.
- Edge Restraints: Install edge restraints around the perimeter to prevent the pavers from shifting over time.
- Landscape Fabric: Optional, but laying landscape fabric over the gravel can prevent weed growth and further stabilize the base.
Taking the time to prepare a robust base sets the stage for the rest of the project and ensures that your pavers won’t shift or sink.
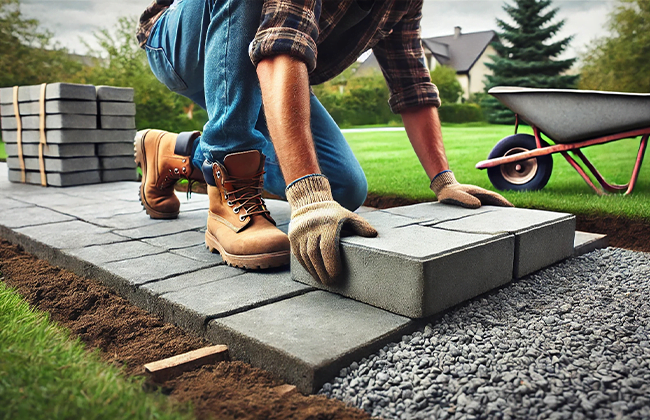
Laying the First Paver
The first paver is the cornerstone of your layout, setting the pattern and alignment for all subsequent stones:
- Start at a Corner: Begin at the lowest corner or along a straight edge if you’re paving a driveway or walkway.
- Set and Level Each Paver: Place the paver in the desired position, use a rubber mallet to tap it firmly into place, ensuring it is level with adjacent stones.
- Alignment Checks: Regularly use a long straight edge or a level to check that the pavers are flush and aligned. Adjust as needed.
Each step here is about precision—ensuring that every paver is perfectly placed and level sets the tone for the entire area.
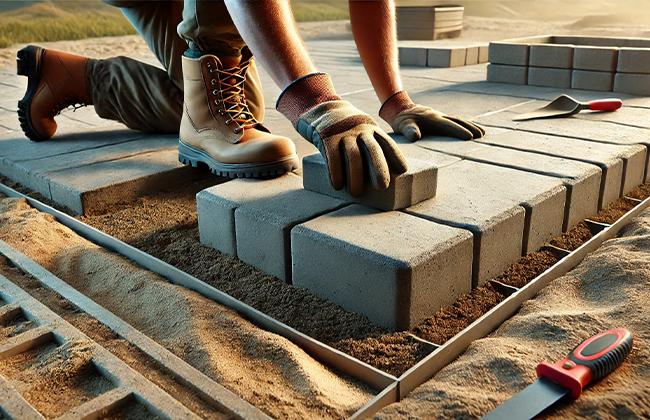
Continuing Your Project
Maintaining consistency and alignment as you progress is key to a visually appealing finish:
- Stagger the Joints: If laying bricks or rectangular pavers, stagger the joints for added stability and aesthetic appeal.
- Keep Checking Level: As you add more pavers, periodically check for level and alignment with a straight edge and spirit level.
- Use Spacers: Consistent joint spacing is crucial for a uniform look, and spacers can help achieve this consistency.
A methodical approach here ensures that your paving project looks professional and remains durable.
Cutting Pavers
Custom cuts might be necessary around edges, corners, or curves:
- Measure Precisely: Before cutting, measure the space where the paver will fit and mark the cutting line clearly on the paver.
- Choose the Right Tool: For clean and precise cuts, use a masonry saw with a diamond blade. For rough cuts, a hammer and chisel may suffice.
- Smooth Edges: After cutting, smooth the cut edges with a masonry rubbing stone to prevent a sharp appearance and feel.
Cutting pavers to fit your space correctly ensures a neat finish and a cohesive look throughout the paved area.
Finishing Touches
The final steps seal the deal on your paving project:
- Fill the Joints: Sweep fine sand over the pavers, filling the joints completely. This helps lock the pavers in place.
- Compact Again: Gently run a plate compactor over the pavers to bed them into the sand.
- Apply Sealant: Applying a sealant can enhance the color of your pavers and protect against stains and weather damage.
These finishing touches are not just about aesthetics; they ensure your pavers are set securely and remain beautiful for years.
With the pavers now perfectly laid, it’s wise to look ahead to maintaining your work and avoiding common pitfalls. The following section, Advanced Tips and Common Mistakes, will cover everything you need to know to keep your paved area looking pristine and functioning perfectly. Stay tuned for those essential insights!
Advanced Tips and Common Mistakes
Laying pavers is not just about placing stones in the dirt; it’s an art that requires attention to detail and foresight. This section will guide you through handling challenging layouts and sidestepping common pitfalls, ensuring your paving project doesn’t just look good on completion but remains durable and functional over time.
Handling Challenging Layouts
Curves and slopes add character to any paved area but require a bit more finesse to get right. Here’s how you can master these complex features:
- Curves: For smooth curves, use smaller pavers that can be laid in a gentle arc. Mark out the curve with a garden hose or spray paint before you start laying pavers. This visual guide will help you maintain an even, flowing line.
- Slopes: If your project is on a slope, you’ll need to pay extra attention to the base layer. Make sure it’s compacted thoroughly to prevent shifting. Consider using a slightly thicker layer of paver sand to accommodate the incline, ensuring each paver is level horizontally.
Handling these areas with care not only enhances the aesthetics but also the functionality, preventing water pooling and uneven settling.
Mistakes to Avoid
Even seasoned DIYers can trip up on some common issues. Keep these in mind to avoid headaches later:
- Skipping the Base Preparation: Never rush the base work. An uneven or insufficiently compacted base can cause your pavers to shift or sink.
- Poor Material Calculation: Always buy a little more material than you think you’ll need. It’s better to have a few extra pavers and bags of sand than to run short mid-project.
- Ignoring the Weather: Don’t lay pavers in extreme weather conditions. Rain can wash away your sand base, and extreme heat can make the job unbearable and messy.
- Failing to Use Edge Restraints: Edge restraints are vital to keep your design locked in place. Without them, pavers at the borders could shift outward over time.
- Overlooking Drainage: Ensure your layout directs water away from buildings and doesn’t create puddles. Poor drainage can undermine your pavers and lead to water damage.
Avoiding these mistakes will save you time, money, and ensure that your paved area remains beautiful and usable for years to come.
With these advanced tips and a keen eye for avoiding common mistakes, you’re well-equipped to tackle any paving project. Next, let’s shift our focus to maintaining your newly laid pavers. In the upcoming section, Maintenance and Care, we’ll cover everything you need to know to keep your paved surfaces in top condition. Stay prepared to keep your area looking as good as new!
Maintenance and Care
After all the hard work of laying pavers, you’ll want to keep them looking as good as the day they were installed. Proper maintenance and occasional repairs are key to extending the life of your paved surfaces and ensuring they continue to enhance your outdoor space. Let’s dig into how to keep your pavers in top-notch condition.
Cleaning and Maintenance Tips
Keeping your pavers clean and maintained isn’t just about aesthetics; it also helps preserve their integrity. Here are some tips to keep your pavers sparkling and sturdy:
- Regular Cleaning: Sweep your pavers regularly to remove dirt and debris. This prevents buildup that can stain or damage the pavers over time.
- Rinsing: Hose down your pavers periodically to wash away any loose dirt. For a deeper clean, especially if you notice staining, use a mild detergent and a stiff brush to gently scrub the surface.
- Weed Prevention: Weeds can sprout between pavers and cause displacement over time. To prevent this, ensure your joint sand is always topped up, and consider using a pre-emergent weed killer in the spring.
- Sealing: Apply a sealant every two to three years to protect your pavers from stains, enhance their color, and reduce weed growth in the joints. Be sure to clean the pavers thoroughly before applying any sealant.
- Stain Removal: Treat stains promptly. Use a paver cleaner specific to the type of stain you’re dealing with, such as oil or rust. Always test the cleaner on a small, inconspicuous area first to ensure it doesn’t discolor the pavers.
By staying on top of these maintenance tasks, you can ensure your pavers remain beautiful and functional for many years.
Repairing Pavers
No matter how well you maintain your pavers, over time, they might need some minor repairs. Here’s how to handle common issues like a pro:
- Replacing a Paver: If a paver cracks or becomes severely stained, it’s often best to replace it. Carefully remove the damaged paver with a flat chisel and hammer, making sure not to disturb the surrounding pavers. Install a new paver in its place, filling the joints with sand.
- Adjusting Pavers: Settling or shifting might occur, especially if there was an issue with the base layer. If pavers become uneven, pry them up with a screwdriver, re-level the base sand, and reposition the pavers.
- Filling Joints: Over time, the sand in the joints may wash away. Refill these gaps with fresh paver sand, and compact it to keep the pavers snug and secure.
Addressing repairs promptly not only keeps your pavement looking pristine but also prevents further damage and maintains the overall stability of your installation.
With these maintenance and care strategies in your toolkit, you’re well-equipped to keep your paver installation looking fresh and functioning perfectly. Remember, a little effort goes a long way in preserving the beauty and durability of your outdoor paving project.
Conclusion
Now that you know how to lay pavers effectively, you can confidently tackle any paving project with precision. Remember, the key to a successful installation is preparation and maintaining attention to detail throughout the process. If you’re looking for professional assistance to lay pavers, don’t hesitate to contact a seasoned contractor at (+1) 917-355-8556 for expert guidance and top-notch service. They’ll help ensure your paving is done right, enhancing the beauty and functionality of your outdoor space.
FAQs
Q: What is the best base material to use when I lay pavers?
A: The ideal base material for laying pavers is crushed stone or gravel combined with sand, offering stability and ensuring drainage.
Q: How often should I seal pavers once laid?
A: It’s advisable to seal pavers every two to three years to protect them from stains, enhance their color, and prevent weed growth in the joints.
Q: Can I lay pavers directly on dirt?
A: Laying pavers directly on dirt is not recommended as it can lead to uneven settling and shifting. A proper base of crushed stone and sand is essential for a stable installation.
Q: What should I do if my pavers start to sink after they have been laid?
A: If pavers begin to sink, lift them, relevel the base with additional sand, compact it, and then reinstall the pavers to ensure a level surface.
Q: How do I cut pavers when I need to fit them around curves or corners?
A: For precise cuts, especially around curves or corners, use a masonry saw with a diamond blade to ensure clean, accurate lines.
Q: How to lay pavers for a patio or driveway?
A: To lay pavers effectively, start by preparing a sturdy base: clear the area of any debris, level the soil, then lay a gravel base followed by sand. Ensure everything is compact and level before placing your pavers.
Q: How to maintain pavers once they are laid?
A: Once you lay pavers, maintain them by regularly sweeping to remove debris and applying a sealant every two to three years. This helps prevent staining and damage from weather exposure, keeping them looking fresh and vibrant.
Q: What are the essential steps in how to lay pavers for a new walkway?
A: Begin by marking your area, excavating to a depth of about 7-8 inches, and filling it with a base layer of crushed stone, followed by sand. Compact each layer thoroughly before finally laying the pavers and filling the joints with sand.
Q: What common mistakes should I avoid when learning how to lay pavers?
A: Ensure you do not skip the preparation of a proper base, which includes leveling and compacting. Also, avoid laying pavers in wet conditions as this can lead to uneven placements and future shifting.