Are you looking at your patio and thinking it could use a bit of a facelift? Restoring brick pavers is not just about bringing back their lost charm but also about enhancing the overall durability and functionality of your outdoor space. Whether your pavers are dulled by time, weather, or wear, learning how to properly restore brick pavers can make all the difference in elevating the aesthetics of your home’s exterior. This guide will walk you through the best practices for brick paver restoration, ensuring your pathways and patios are not only beautiful but built to last.
Table of Contents
What Causes Deterioration in Brick Pavers?
Brick pavers add a touch of class and practicality to any outdoor setup, whether it’s a cozy patio or a bustling driveway. However, even the sturdiest brick pavers can show signs of wear and tear over time. Knowing what damages these pavers can help you keep them in tip-top shape for years to come. Let’s dive into the main culprits behind the deterioration of brick pavers:
Weather Effects
The weather plays a huge role in the life of your brick pavers. In regions where temperatures dip below freezing, water can seep into tiny cracks and expand upon freezing, leading to larger cracks or even causing the bricks to break apart. On the flip side, in hot climates, the intense sun can bleach the beautiful colors of your pavers, leaving them looking washed out and old. Also, extreme heat can cause the pavers to expand and, sometimes, shift out of place. Regular sealing can help protect them from these harsh elements, ensuring they last longer and continue to look great.
Stain and Moss Accumulation
Now, onto stains and moss—these aren’t just eyesores; they can actually damage the structural integrity of your pavers. Spills from oil, wine, or barbecue grease penetrate porous brick materials, leading to stubborn stains that are tough to remove. Moss and algae, on the other hand, thrive in moist, shaded areas and can create a slick surface that’s not just unsightly but also hazardous. Regular cleaning and applying a proper sealant can significantly reduce these problems, keeping your pavers pristine and safe.
Shifting and Settling
Lastly, shifting and settling are natural processes for any installation but can be accelerated by improper installation or subpar base materials. Over time, the ground beneath the pavers can erode or compact unevenly, causing the bricks to become uneven or create tripping hazards. This not only affects the aesthetics but can also lead to water pooling in certain areas, exacerbating wear and further shifting. Ensuring that your pavers are laid on a stable, well-compacted base can prevent many of these issues.
As we wrap up this section and you ponder these insights, it’s clear that regular maintenance tailored to these specific challenges is key. Now, let’s assess your brick pavers’ condition to determine the best restoration approach. Moving forward, we’ll explore how to spot potential problems before they escalate, ensuring your pavers remain as durable and inviting as they were on day one.
Assessing Your Brick Pavers’ Condition: A Closer Look
Wondering what secrets your brick pavers might be hiding?
It’s time to play the role of an outdoor detective to uncover the true condition of your patio or walkway. Here’s how to conduct a thorough and effective inspection that’s almost as fun as it is informative.
Step-by-Step Visual Inspection: Seeing the Signs
- Start with a Stroll: Kick off your inspection with a leisurely walk. This isn’t just any walk; it’s a mission to uncover every crack, chip, and character mark that tells the story of your pavers’ life.
- Detail Detective Work: As you tour, pay special attention to the gaps between the pavers. Are there signs of moss or weeds? These green invaders are more than unsightly—they’re clues pointing to potential moisture issues that can lead to bigger problems.
- Note It Down: Arm yourself with a notepad or your smartphone to document what you find. Snap pictures and make notes about each issue. This visual diary will be invaluable when planning the restoration.
Zooming In on Problem Areas: Prioritize for Precision
- High Traffic, High Drama: Certain areas bear more weight, both literally and figuratively. Driveway entrances and paths near gutter downspouts typically show more wear. These areas are your high-priority zones and need the most robust care.
- Mark Your Map: Use your notes to create a map of sorts. Mark areas that need a simple clean-up versus those crying out for more intensive repairs or a full paver replacement. This map will guide your restoration efforts, ensuring no area is overlooked.
Tapping into Tech: Use Your Phone
- Tech Assist: Consider using your phone’s camera or an app designed for home improvement projects to help assess flatness and level. Some apps provide tools that use augmented reality to highlight uneven areas—a high-tech approach to spotting issues that might escape the naked eye.
With your inspection now complete, you’re not just prepared—you’re empowered to take the next steps. Moving into the cleaning phase, we’ll explore state-of-the-art techniques to wash away years of dirt and grime, setting the stage for repairs and sealing. This isn’t just maintenance; it’s a makeover for your cherished outdoor space. Ready to roll up your sleeves and bring back the beauty of your brick pavers?
Let’s dive into the nuances of effective cleaning in the next section, tackling each challenge with precision and care.
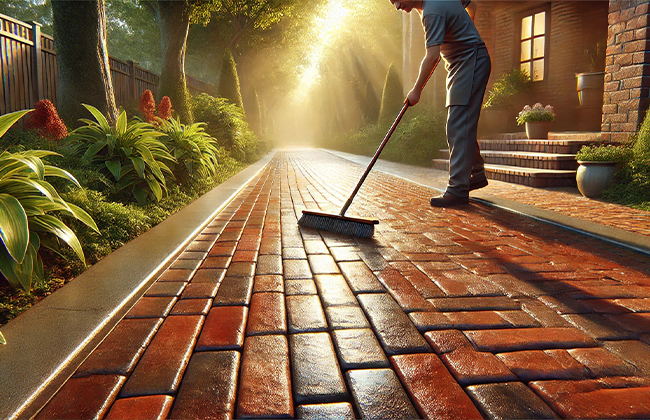
Cleaning Your Brick Pavers: Out with the Old, In with the New
Reviving the charm of your brick pavers starts with a good, thorough cleaning. It’s not just about aesthetics; it’s about preparing the surface for further restoration steps like sealing or repairing. Here’s how to ensure your pavers are spotless and ready for a facelift.
Choosing the Right Cleaning Solutions
- Eco-Friendly Choices: Opt for environmentally friendly cleaners that are tough on stains but gentle on your pavers and the planet. Solutions containing natural acids like vinegar or citric acid can break down dirt without damaging the pavers or harming your garden.
- Chemical Cleaners: For tougher stains, you might need something stronger. Choose a cleaner specifically designed for brick pavers. Always follow the manufacturer’s instructions to avoid discoloration or damage.
Step-by-Step Cleaning Process
- Prep Your Space: Remove any furniture or decorations from the area. Sweep the pavers to clear loose debris and dirt, making the cleaning process more effective.
- Apply Cleaner: Mix your chosen cleaner according to the instructions. Use a sprayer or a brush to apply it evenly across the pavers. Don’t rush—let the cleaner sit for a while to break down the dirt and stains.
- Scrub Away: For stubborn areas, use a stiff brush to scrub the pavers. This action helps lift the dirt from the pores of the bricks.
- Rinse Thoroughly: Wash away the cleaner with a hose or a pressure washer on a low setting. It’s important to remove all residues to prevent any slippery surfaces once the pavers dry.
Tips for Stubborn Stain Removal
- Oil and Grease: Use a degreaser or apply kitty litter overnight to absorb the grease. Sweep it away the next morning, then wash the area with a strong detergent.
- Moss and Algae: For biological growths, a mixture of bleach and water can be effective. Apply it to the affected areas, let it sit for 10-15 minutes, then scrub and rinse.
- Rust Stains: Rust can be particularly stubborn. Commercial rust removers that are safe for brick pavers can do the trick. Apply as directed, and gently scrub the stain away.
With your pavers now clean and looking like new, it’s crucial to address any damage they might have sustained over the years. Up next, we’ll tackle the process of repairing damaged pavers—filling in the cracks and replacing the irreparable ones, ensuring your restored pavers are not only clean but also structurally sound and safe to enjoy. Let’s roll up our sleeves and bring those pavers back to life, ensuring every step we take maximizes their beauty and longevity.
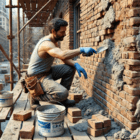
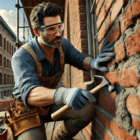
Repairing Damaged Pavers: Restoring Strength and Beauty
Once your pavers are spick and span, it’s time to address any damage they’ve sustained over the years. Tackling this not only enhances the appearance of your walkways or patios but also ensures their safety and longevity. Let’s explore how to effectively repair cracked or broken pavers and correct any unevenness.
Replacing Cracked or Broken Pavers
The first step in repairing your pavers involves removing the cracked or broken ones. Start by gently lifting the damaged paver with a pry bar, being careful not to disturb the neighboring pavers. Once removed, inspect the base—level it out and add fresh sand if necessary to provide a stable foundation. Place the new paver in the gap, ensuring it fits snugly. Use a rubber mallet to tap it gently until it’s flush with the surrounding pavers. Finally, spread sand over the replaced paver and into the surrounding joints to secure it in place.
Fixing Uneven Pavers
Uneven pavers can be a trip hazard and detract from the overall look of your space. To fix this, identify the uneven pavers and carefully lift them. Check the underlying base—often, it’s either eroded away or compacted unevenly. Adjust the base by adding or removing sand until it’s perfectly level. Reinstall the pavers, ensuring they are flush and stable, and tamp them down firmly.
Repairing your pavers not only boosts the curb appeal but also makes your outdoor space safer and more functional. With all pieces now level and secure, it’s an excellent time to consider sealing your pavers. Sealing not only locks in your hard work but also shields your pavers from weathering and stains. Up next, let’s dive into how to seal your pavers effectively, ensuring they remain durable and vibrant for years to come.
Sealing Brick Pavers: The Final Touch
Now that your brick pavers are clean and in tip-top shape, it’s time to seal the deal—literally. Sealing is like the superhero cape for your pavers; it provides protection and enhances their appearance. Let’s explore why sealing is essential, how to pick the right sealer, and the best way to apply it for long-lasting results.
Benefits of Sealing Your Pavers
Sealing your pavers isn’t just an extra step; it’s essential for keeping them looking great and lasting longer. Here’s what sealing does:
- Protection Against the Elements: Sealer forms a barrier that helps protect your pavers from rain, sun, and even stains from spills. This means less fading, less weathering, and fewer stains.
- Enhances Color: Ever noticed how vibrant your pavers look when they’re wet? A sealer can give them that rich color boost all the time, making the colors pop and giving your outdoor space a more polished look.
- Prevents Weed Growth: By sealing the joints, you minimize the chances of weeds poking through your beautiful patio or driveway. No more pulling weeds on your weekend mornings!
Selecting the Right Sealer
Choosing the right sealer is crucial. Not all sealers are created equal, and the best one for your pavers depends on a few factors:
- Type of Pavers: Different materials may require different types of sealers. Make sure the sealer you choose is compatible with your brick pavers.
- Desired Finish: Sealers come in various finishes, from matte to glossy. Think about the look you want to achieve. A glossy finish might enhance the color more, while a matte finish will look more natural.
- Breathability: Opt for a breathable sealer, especially for outdoor use. This allows any moisture trapped underneath to escape, preventing damage like cracking or efflorescence.
Application Techniques for Long-Lasting Protection
Applying sealer might seem straightforward, but a few tips and tricks can ensure it does its job effectively:
- Timing Is Everything: Wait for a clear, dry day to apply sealer. Moisture in the air or on the pavers can affect how well the sealer adheres.
- Clean First: Only apply sealer to clean, dry pavers. Any dirt or moisture trapped under the sealer might cause hazing or prevent the sealer from adhering properly.
- Even Application: Use a sprayer or a roller designed for sealer application to ensure even coverage. Start from one corner and work your way out to avoid missing any spots.
- Two Thin Coats: Instead of one thick coat, apply two thin coats. This technique helps ensure full coverage and avoids pooling, which can lead to uneven sealing.
By sealing your pavers, you’re not just finishing up a project; you’re setting up your outdoor space for years of enjoyment and minimal maintenance. With your pavers now sealed and protected, let’s keep them looking as good as new by diving into some ongoing maintenance tips in the next section. This way, you can enjoy a pristine patio without the backbreaking work down the line!
Maintaining Your Restored Brick Pavers: Keeping Them Perfect
Great job sealing those pavers! Now, let’s talk about keeping them in pristine condition. Regular maintenance is key to prolonging the life and beauty of your brick pavers. Here’s how you can keep them looking their best with routine cleaning, preventing future damage, and knowing when it’s time to call in the pros.
Routine Cleaning Tips
- Regular Sweeping: Dirt and debris can quickly accumulate on your pavers, leading to stains or even moss growth. Make it a habit to sweep your pavers regularly, especially after storms or windy days.
- Occasional Rinsing: Every now and then, give your pavers a good rinse with a garden hose. This helps remove any dirt that sweeping can’t get and prevents build-up.
- Spot Cleaning Stains: If you notice a spill or stain, tackle it immediately with a mild detergent and a brush. This prevents the stain from setting in and becoming a bigger problem later.
Preventing Future Damage
- Use the Right De-icers: In colder climates, avoid using rock salt on your pavers. It can damage the surface over time. Opt for safer alternatives like calcium chloride or magnesium chloride to melt ice without harming your pavers.
- Mind the Edges: Keep an eye on the edges of your paver installation. These are often the first spots to show signs of wear. Ensure they’re firmly in place and add more paver sand if you see any gaps.
- Furniture Pads: If you have outdoor furniture on your pavers, consider using furniture pads. These prevent scratches and can stop metal furniture from rusting onto the pavers.
When to Call in Professionals
- Structural Concerns: If you notice significant shifting or sinking, it might be time to call in a professional. They can assess the underlying issues and perform more complex repairs that go beyond simple DIY fixes.
- Deep Cleaning: Over time, your pavers might need a more thorough cleaning than you can achieve with home methods. Professional cleaning can restore the look of your pavers without the risk of damage from overzealous DIY efforts.
- Re-Sealing: While sealing isn’t an annual necessity, it’s good to have professionals reapply sealer every few years to ensure continuous protection, especially in high-traffic areas.
Maintaining your brick pavers isn’t just about keeping them looking good; it’s about extending their life and functionality. With these simple steps, you’re well-equipped to enjoy a beautiful, durable outdoor space for years to come. And remember, as you continue to enjoy your revitalized pavers, stay tuned for the latest innovations in paver restoration technology that we’ll explore next. These cutting-edge techniques could further simplify your maintenance routine and enhance the longevity of your pavers.
Innovative Restoration Techniques: The Cutting-Edge of Paver Care
Now that your brick pavers are looking as good as new, let’s keep things exciting by exploring some of the latest innovations in paver restoration. From groundbreaking products to a look at DIY versus professional services, staying ahead with these new techniques can make maintaining your pavers both easier and more effective.
Latest Products and Tools in the Market
- Eco-Friendly Sealers: The new wave of eco-friendly sealers not only protects your pavers but also does it without harming the environment. These products offer excellent protection against stains and moisture while being safe for plants and animals around your pavers.
- Robotic Pressure Washers: Imagine sitting back while a robotic pressure washer cleans your pavers. These smart machines can navigate and clean with precision, ensuring every nook and cranny is spotless without any effort on your part.
- Polymeric Sand: This isn’t your average sand. When applied between the pavers, polymeric sand hardens and locks the pavers in place, drastically reducing weed growth and the need for frequent touch-ups.
DIY vs. Professional Restoration Services
- DIY Pros and Cons: DIY can be a cost-effective option and gives you direct control over the timing and materials used. However, it requires time, effort, and a bit of know-how to get things right. It’s great for small, manageable projects but might be overwhelming for larger areas or more complex issues.
- Professional Services: Calling in the pros can be a game-changer. They bring expertise, high-grade equipment, and efficiency to the table. If you’re looking at significant repairs or a complete overhaul, professional services ensure the job is done right the first time. Plus, they can often spot potential issues before they become major problems.
Choosing between DIY and professional restoration services often comes down to the scale of the project and your comfort with the tasks at hand. Whichever route you choose, staying informed about the latest techniques and products will help you make the best decisions for maintaining the beauty and longevity of your pavers.
So, whether you decide to grab a new tool from the hardware store or call in a seasoned pro, you’re now equipped with the knowledge to keep your pavers in peak condition. Remember, the goal is to enjoy your outdoor space, not toil over it—so choose the methods that work best for you and keep paving the way to a beautiful home exterior!
Conclusion
After diving deep into the various steps to restore brick pavers, it’s clear that maintaining and restoring the beauty of your pavers is an ongoing commitment that requires the right knowledge and tools. Whether you decide to DIY or bring in a professional, using the latest techniques and products can greatly enhance the longevity and appearance of your brick pavers. If you’re looking for a professional contractor to help restore brick pavers, feel free to contact us at (+1) 917-355-8556 for expert assistance.
FAQs
Q: What are the first steps to restore brick pavers?
A: To restore brick pavers, start by thoroughly cleaning them to remove any dirt, moss, or debris. Assess the area for any damaged or uneven pavers that might need replacing or re-leveling.
Q: How often should I seal my restored brick pavers?
A: It’s recommended to seal restored brick pavers every 2-3 years, depending on foot traffic and weather conditions, to protect them from stains, fading, and wear.
Q: Can I restore brick pavers on my own or should I hire a professional?
A: Restoring brick pavers can be a DIY project if you have the time and basic tools. However, for extensive repairs or professional-grade results, hiring a contractor might be more effective.
Q: What are the best products to use when I restore brick pavers?
A: When you restore brick pavers, use high-quality sealers and cleaners designed specifically for brick pavers to ensure long-lasting protection and aesthetics.
Q: What is the biggest challenge when trying to restore brick pavers?
A: The biggest challenge is often dealing with uneven settling or extensive damage, which may require lifting and re-laying multiple pavers, requiring time and precision.
Q: How do you bring brick pavers back to life?
A: Revive brick pavers by thoroughly cleaning them, removing any weeds, and applying a new layer of sand in the joints, followed by sealing them to protect against future wear.
Q: How to make brick pavers look new?
A: To make brick pavers look new, start with a power wash to remove dirt and grime, repair any damaged areas, and finish with a sealer to enhance their color and sheen.
Q: How to refurbish brick paving?
A: Refurbish brick paving by replacing broken pavers, re-leveling areas where settlement has occurred, and applying a fresh coat of sealant to restore their original luster.
Q: How to reset brick pavers?
A: Reset brick pavers by lifting them, re-preparing the base with compacted sand or gravel, and then carefully placing the pavers back in position to ensure a flat surface.
Q: Do brick pavers fade over time?
A: Yes, brick pavers can fade over time due to exposure to sunlight and weather conditions, but this can be mitigated by regularly applying a UV-resistant sealer.
Q: How do you freshen brick pavers?
A: Freshen up brick pavers by cleaning them with appropriate solutions, filling the joints with fresh polymeric sand, and applying a sealer to bring out their color and protect them.
Q: What is the best way to adhere pavers to concrete?
A: The best way to adhere pavers to concrete is by using a bonding adhesive designed for masonry, which ensures a strong hold and durability under various weather conditions.
Q: How do you attach brick pavers to concrete?
A: Attach brick pavers to concrete by applying a layer of mortar or construction adhesive, ensuring each paver is firmly placed and aligned with the others for a uniform appearance.
Q: Can you put concrete between pavers?
A: Yes, you can put concrete between pavers, especially in high-traffic areas, to provide a more stable and permanent pathway, but it reduces the flexibility and natural aesthetic of the pavers.
Q: How often should you restore brick pavers to maintain their appearance and durability?
A: To maintain their appearance and durability, it’s recommended to restore brick pavers every 2-3 years. This includes deep cleaning, checking for any necessary repairs, re-sanding the joints, and applying a fresh sealant to protect against weather elements and wear.