Understanding how to level pavers is crucial for anyone aiming to enhance their outdoor living space. Whether you’re looking to install a new patio, driveway, or walkway, leveling pavers correctly ensures a smooth, stable surface that withstands the test of time. This guide will provide you with step-by-step instructions on how to prepare the site, set the base, and lay the pavers to achieve professional results.
Preparation: Setting the Stage for Success
When you’re getting ready to level pavers, the first thing you need to do is set up your workspace correctly. This means clearing the area of any debris, vegetation, and making sure the ground is somewhat level. By getting these initial steps right, you’re laying a solid foundation (pun intended!) for a smoother and more effective leveling process. Let’s break this down further so you know exactly what to do and what you’ll need.
Materials and Tools Needed
Before we jump into the nitty-gritty, let’s make sure you have all the tools and materials on hand. This way, you can breeze through the preparation stage without any hitches:
- Measuring tape: You’ll need this to measure out the exact dimensions of the area you’re paving. Accurate measurements are key to buying the right amount of materials and ensuring your space is evenly covered.
- Wooden stakes: These will help you mark out the boundaries of your project area. It’s like drawing a blueprint directly on the ground.
- String line: Tie these between your stakes to create a visible line that guides your excavation and base layering. It’s all about keeping things straight and aligned!
- Level: This is crucial for checking that your surface is even. An uneven base means uneven pavers, so don’t skip this step!
- Rake: You’ll use a rake to even out the base materials before compacting them. It’s also handy for clearing out small debris.
- Sand: A must-have for setting your pavers into place. Sand acts as a cushion and helps you make minor height adjustments as you lay the pavers.
- Compactor: This tool is used to solidify your base layer and later to secure the pavers into the sand. It’s essential for creating a stable and durable paved surface.
By gathering these items before you start, you’ll ensure the project goes smoothly and stays on track. Let’s get to work and turn that dream project into a reality, step by step!
Step 1: Marking and Excavation – How to Level Pavers: Starting Right
Beginning with Clear Boundaries
First things first, you’ll need to mark where your pavers will eventually go. It’s like drawing out a map for your project. Grab those wooden stakes and string to define the exact boundaries. This is crucial because it tells you where to dig and helps ensure that everything lines up just right in the end.
Digging In
Once your area is marked, it’s time to dig up the soil. This is where your project starts to take shape—literally! You’ll need to remove the soil to a specific depth to accommodate both the base material and the pavers themselves. This depth is critical as it ensures your pavers are well supported and level with the ground around them.
Determining Depth
- Walkways: Typically, you’re looking at a depth of about 4-6 inches. This allows enough room for both the base material and the pavers to fit snugly.
- Driveways: You’ll want a bit more depth here, about 8-12 inches, due to the extra wear and tear driveways endure. This depth helps support the heavier load.
Step 2: Base Preparation – How to Level Pavers: Laying a Solid Foundation
Laying the Groundwork
Once you’ve dug to the correct depth, it’s time to focus on creating a sturdy base, which is crucial for keeping your pavers level and stable over time. Start by spreading a layer of crushed stone across the excavated area. This stone acts as a strong foundation for the pavers and helps with drainage, which is essential for maintaining the integrity of your paved area.
Compacting the Base
After laying down the crushed stone, use a compactor to press it down. This process is vital as it solidifies the base, ensuring that the surface is firm and won’t shift under weight or due to weather. It’s a good idea to check the level as you go; maintaining an even surface now means you won’t have trouble with uneven pavers later.
Applying and Leveling the Base Material
- Ideal Thickness: For patios, aim for a base thickness of about 4 inches. This provides a solid layer for areas that will receive regular but lighter foot traffic.
- For Driveways: Increase the thickness to about 8 inches. The extra depth provides the necessary support for vehicles, helping to prevent the pavers from shifting and the base from eroding over time.
Step 3: Sand Layer – How to Level Pavers: Achieving Perfect Balance
Spreading the Sand
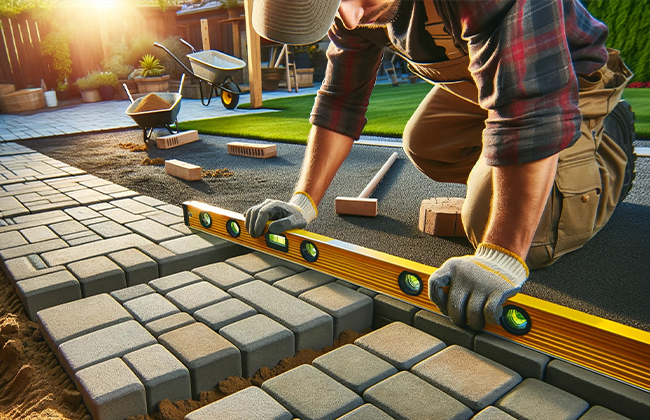
With your solid base in place, it’s time to move on to the sand layer. This step is crucial for achieving that final level surface and providing a soft bed to nestle your pavers into. Spread a fine layer of sand evenly across the compacted base. Using a straight edge or a level can help you ensure that this layer is perfectly flat and even throughout.
Perfecting the Sand Layer
The sand plays a key role not just in leveling but also in cushioning the pavers, which helps prevent cracking and shifting over time. It’s essential to get this layer just right to avoid any future problems with your paving.
Sand Layer Tips
- Thickness: Aim for about 1 inch of sand. This thickness is ideal as it allows for minor adjustments in the height of the pavers during installation.
- Type of Sand: Use concrete sand for its coarser and sharper texture, which provides better stability and interlock for the pavers.
Step 4: Laying the Pavers
Starting the Installation
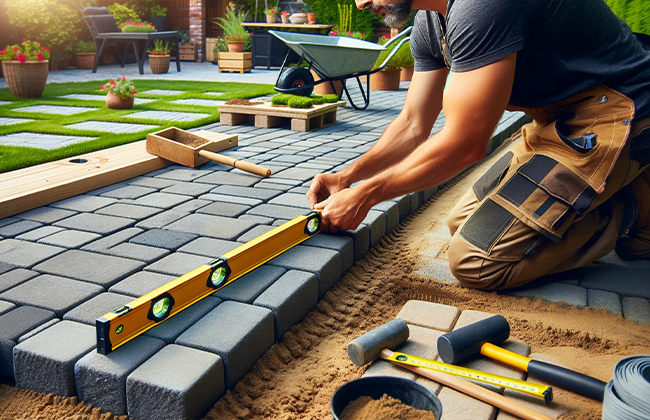
Now that your sand layer is perfectly flat and ready, it’s time to start laying the pavers. Begin at one corner of your project area, and place each paver snugly against the others. This is where your project really starts to take shape, and you see the fruits of your labor coming together.
Ensuring Level Placement
As you lay each paver, use a rubber mallet to tap them gently into the sand. This helps ensure that each paver is not only snug but also perfectly level with its neighbors. Consistency here is key to achieving a professional-looking finish that’s not only pleasing to the eye but also safe and stable underfoot.
Patterns and Techniques
- Herringbone: This interlocking pattern is great for high-traffic areas as it effectively distributes the load and maintains integrity over time.
- Basketweave: This classic pattern adds quaint charm and visual interest, perfect for creating a cozy patio or courtyard.
- Stretcher Bond: Often used for walkways, this simple linear pattern is easy to lay and gives a neat, orderly appearance.
Step 5: Cutting Pavers
Tailoring Pavers to Fit
As you lay your pavers, you’ll almost certainly encounter areas where full pavers don’t quite fit. This is where cutting comes in. To keep your layout consistent and ensure everything looks neat and professional, you’ll need to make some precise cuts.
Using the Right Tools
A masonry saw is the ideal tool for this job. It’s designed to slice through stone cleanly and efficiently, giving you a smooth, straight edge that will fit perfectly into your paving pattern.
Safety Tips for Cutting Pavers
- Protective Eyewear and Gloves: Always wear safety glasses and heavy-duty gloves. Cutting pavers can kick up sharp shards and dust, so it’s crucial to protect your eyes and hands.
- Measure Twice, Cut Once: This old carpenter’s adage holds true for cutting pavers as well. Double-check your measurements before making a cut to ensure accuracy and minimize waste.
Step 6: Sealing and Finishing
Completing the Installation
Alright, now that all your pavers are perfectly laid out and cut to fit, it’s time to finish things off with a couple of crucial steps. First, grab a broom and sweep sand over your newly laid pavers. This sand should work its way into the joints between the pavers, which is key for the next step.
Locking Everything in Place
With the joints filled, take your compactor and pass it over the pavers. This action helps set the pavers firmly into the sand base and ensures that the sand fills up all the spaces between them properly. It’s like dotting the i’s and crossing the t’s—essential for a tidy finish!
Applying Sealer
The final touch? Sealer. Applying a sealer to your pavers not only protects them from the elements but also enhances their color, making them look vibrant and new for years to come.
Benefits of Sealing Pavers
- Prevents Weed Growth: Sealer stops weeds from popping up in the joints, keeping your patio or walkway neat and tidy.
- Enhances Color and Durability: Sealer brings out the color of your pavers and protects them from fading and wear. It’s like a sunscreen for your patio!
Maintaining Your Paved Area – How to Level Pavers
Keep It Looking Fresh
To keep your paved area looking as good as new, regular maintenance is key. This doesn’t have to be a chore; a little upkeep goes a long way.
- Weed Removal: Pull out any weeds that manage to sprout, especially before they set deep roots.
- Sand Refill: Over time, the sand in the joints may wash away or settle. Top it up as needed to keep your pavers stable and even.
- Periodic Cleaning: A gentle wash or a sweep can help remove dirt and debris, preventing buildup and staining.
By taking these simple steps to seal and maintain your pavers, you ensure a durable, beautiful surface that will serve you well for many gatherings, playtimes, and quiet moments outdoors. So, there you have it—laying pavers demystified! Whether you’re a seasoned DIYer or a newbie looking to enhance your home’s outdoor space, following these steps will help you achieve a professional-looking result. Ready to enjoy your new, fabulous outdoor area? Let’s get to it!
Conclusion
Now that you know how to level pavers, you’re well on your way to creating a stunning outdoor area that’s as functional as it is beautiful. If you feel the task is beyond your DIY skills and you’re searching for a professional contractor for paver installation, don’t hesitate to reach out. Contact us at (+1) 917-355-8556 to find expert help and ensure your project is handled with care and precision.
FAQs
Q: What is the first step in how to level pavers?
A: The first step in how to level pavers is to properly prepare the site. This includes clearing the area of debris and ensuring the ground is level before laying down a solid base of crushed stone and sand.
Q: How thick should the sand layer be when learning how to level pavers?
A: When learning how to level pavers, aim for a sand layer approximately 1 inch thick. This provides a stable base while allowing for minor adjustments in paver height during installation.
Q: What are the best tools to use for how to level pavers?
A: For leveling pavers, essential tools include a long level, a rubber mallet, and a masonry saw for any pavers that need cutting to fit your layout precisely.
Q: Can I use a compactor in how to level pavers?
A: Yes, using a compactor is recommended when leveling pavers as it helps to firmly set the pavers into the base material and ensures that all layers are compact and stable.
Q: What safety precautions should I take when learning how to level pavers?
A: Safety is paramount when learning how to level pavers. Always wear protective gear such as gloves and safety goggles, especially when cutting pavers or operating a compactor.


