 ChatGPT
 Perplexity
 Google AI
 Claude
Paving stone is a smart choice for enhancing exterior areas such as patios, walkways, driveways, and garden paths. When installed correctly, pavers create a long-lasting, weather-resistant surface that can handle heavy foot traffic and changing climate conditions. While many homeowners rely on professional contractors, it is also possible to complete paving as a DIY project by following proper installation techniques.
Paving installation refers to the process of preparing a stable base, laying pavers in a structured pattern, and securing them to create a durable surface for residential and commercial use.
Are you planning to install paving yourself? This guide explains how to install paving step by step, along with practical DIY tips and an overview of the expected cost.
- Ο Paving installation typically costs between $10 and $30 per square foot, depending on material and project size.
- Ο Proper base preparation and compaction are essential for long-term stability.
- Ο Concrete pavers are more cost-effective, while natural stone options are higher in price.
- Ο Drainage planning plays a key role in preventing water damage and surface shifting.
- Ο A well-installed paving surface can last 30 to 50 years with basic maintenance.
Complete Step-by-Step Guide to Paving Installation
Following a structured paving installation process ensures a stable base, proper drainage, and long-term surface performance.
1. Prepare and measure the space
The first step in paving installation is identifying the exact area where the pavers will be installed and calculating the required materials accurately.
- Measure the length and width of the installation area.
- Calculate the total square footage required.
- Select a suitable paver pattern or layout.
- Plan proper drainage to prevent water accumulation.
- Add 5–10% extra pavers for cutting and future replacements.
Example calculation for paving area:
| Layout sizing | Outcome |
|---|---|
| Linear measurement | 12 feet |
| Breadth | 10 feet |
| Full coverage | 120 square feet |
2. Create the paver layout plan
Once measurements are complete, define the layout to ensure straight alignment and correct slope.
- Place stakes at each corner of the planned area.
- Use string lines to maintain straight edges.
- Mark the final height of the paving surface.
- Ensure a slight slope for effective drainage.
3. Excavate and remove soil
Excavation is essential for building a strong sub-base that supports the paving surface. Proper depth and preparation are especially important for driveways, as they directly impact performance and help support durable driveway paving options under heavy loads.
- Remove 6–8 inches of soil for patios and walkways.
- Remove 8–12 inches of soil for driveways.
- Level and compact the ground surface.
- Remove roots, debris, and loose soil.
4. Install landscape fabric
Landscape fabric helps stabilize the base and reduces long-term maintenance issues.
- Prevents weed growth
- Improves drainage efficiency
- Supports base layer stability
- Minimizes soil movement
Lay the fabric evenly across the excavated area before adding the base material.
5. Compact the base layer properly
The base layer is critical for load distribution and preventing surface failure over time.
- Add 3–6 inches of crushed gravel or aggregate base.
- Level the material evenly using a rake.
- Compact thoroughly using a plate compactor.
- Add material in layers if required for better compaction.
Common base materials used in paving:
| Paving material | Reason for use |
|---|---|
| Aggregate base | Supports drainage and structural load |
| Crushed limestone | Creates a stable base layer |
| Sub-base material | Handles heavy usage and pressure |
Proper compaction reduces the risk of sinking and uneven surfaces.
6. Apply the sand bedding layer
A bedding layer ensures even placement and alignment of pavers. This step plays a key role in maintaining surface accuracy, as proper paver leveling techniques help prevent uneven installation and future shifting.
- Spread approximately 1 inch of bedding sand over the base.
- Use a screed or straight edge to level the surface.
- Avoid walking on the sand after leveling.
This layer allows pavers to settle evenly during installation.
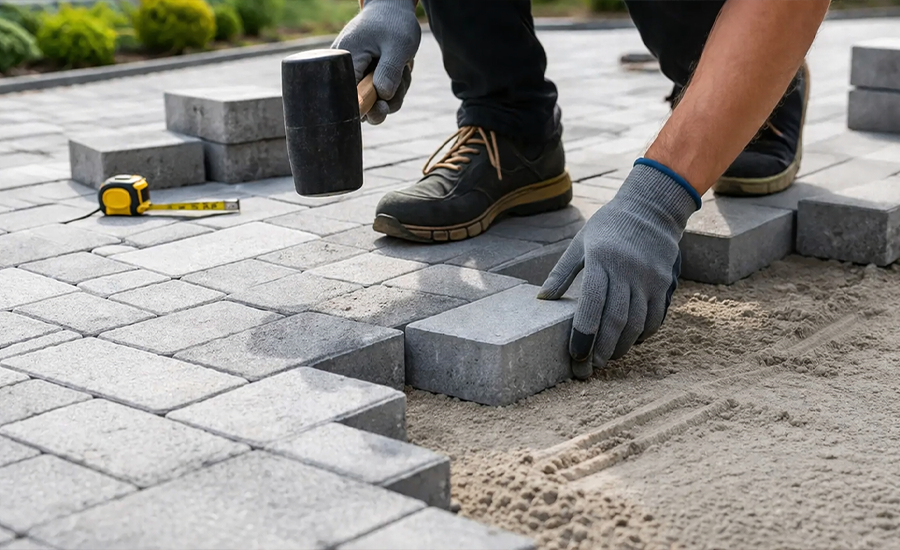
7. Lay the pavers
This is where the visible paving surface is formed, and careful placement is essential to maintain alignment and spacing throughout the patio paving installation process.
- Start from a straight edge or corner.
- Place pavers according to the selected pattern.
- Maintain consistent spacing between units.
- Tap lightly with a rubber mallet to secure placement.
- Check alignment regularly using a level.
8. Cut and shape pavers for edges
Edge areas require precise cutting for a clean finish.
- Use a masonry saw for accurate cuts.
- Use a paver splitter for quick adjustments.
- Always wear protective gloves and safety goggles.
Accurate cutting improves both appearance and structural fit.
9. Install edge restraints
Edge restraints help maintain the integrity of the paving layout.
- Prevent lateral movement
- Maintain pattern alignment
- Strengthen the overall structure
- Improve long-term durability
Secure restraints using spikes or anchors along the edges.
10. Fill joints with polymeric sand
Joint filling locks the pavers together and improves durability.
- Spread polymeric sand across the surface.
- Sweep sand into the joints thoroughly.
- Compact the surface using a plate compactor.
- Lightly mist with water to activate the sand.
Polymeric sand hardens after activation and helps prevent weed growth and joint erosion.
DIY Tips for a Smooth and Professional Paving Finish
DIY paving requires proper planning, accurate leveling, and attention to detail. Without correct base preparation and alignment, the surface may become uneven over time. These practical tips help improve the final result and long-term durability, while also helping you avoid unnecessary expenses and manage your driveway paving cost estimate more effectively.
- Ensure the base is fully compacted to prevent future sinking.
- Check levels frequently during installation for consistent alignment.
- Work in small sections to maintain accuracy.
- Avoid installing pavers during heavy rain or wet conditions.
- Use string lines to keep rows straight and uniform.
- Plan drainage properly to prevent water pooling and surface damage.
Even small mistakes in base preparation or leveling can reduce the lifespan of the paving surface.

How Long Does DIY Paving Installation Take?
The time required for paving installation depends on project size, site conditions, and experience level. Most residential paving projects, such as patios and walkways, can be completed within 2–3 days, while larger areas like driveways or parking spaces may take 3–5 days.
The overall timeline also depends on proper planning, base preparation, and drainage setup. In some cases, additional time may be required for material setting and surface stabilization, especially when using concrete or asphalt-based layers. Project duration can also vary depending on the cost of installing pavers, as material choices and design complexity often influence both budget and completion time.
DIY paving can reduce labor costs, but using proper materials and installation methods is essential to achieve long-lasting results.
Estimated Time for Different Paving Projects
| Scope of work | Time requirement |
|---|---|
| Sidewalk section | 1–2 days |
| Outdoor patio construction | 2–3 days |
| Roadway surfacing | 3–5 days |
Working carefully and following each installation step correctly ensures better results than rushing the process.
Final Thoughts
By following correct paving installation methods, preparing a stable base, and using the right equipment, homeowners can achieve a long-lasting and visually appealing surface with a DIY approach. The most important factors include proper base preparation, effective compaction, and accurate placement of pavers to ensure structural stability.
With the right techniques and attention to detail, your patio, walkway, or driveway can remain strong, weather-resistant, and functional for many years.
Sardar Restoration Corp supports residential and commercial properties across NYC, including the Bronx, Manhattan, Brooklyn, Westchester, and Queens. For property assessments, you can reach our team at (+1) 917-355-8556, email sardarrestoration@gmail.com, or visit 2770 Fish Ave, Bronx, NY 10469, United States.
FAQs
Can I install pavers without professional help?
Yes, pavers can be installed without professional help if proper base preparation, compaction, and leveling techniques are followed. However, beginners may still benefit from professional guidance to avoid uneven surfaces or drainage issues.
How thick should the base be for pavers?
The ideal base thickness is 4–6 inches for patios and walkways, and 8–12 inches for driveways or areas exposed to heavy loads. Proper depth ensures stability and prevents sinking over time.
What is the best base material for paving?
Crushed gravel and crushed limestone are the most commonly used base materials because they provide strong load support, proper drainage, and long-term durability.
Do I need edge restraints for pavers?
Yes, edge restraints are essential as they prevent pavers from shifting, maintain the layout pattern, and improve the overall structural stability of the surface.
How long do paving stones last?
Paving stones typically last 20–30 years when installed correctly with proper base preparation and maintenance. Their lifespan can vary depending on weather conditions and usage.
How much does DIY paving cost?
DIY paving typically costs between $10 and $30 per square foot, depending on material type, project size, and additional features such as edging or drainage systems.
What mistakes should you avoid when installing pavers?
Common mistakes include poor base compaction, incorrect leveling, ignoring drainage planning, and inconsistent spacing between pavers. These issues can lead to uneven surfaces and reduced durability.


