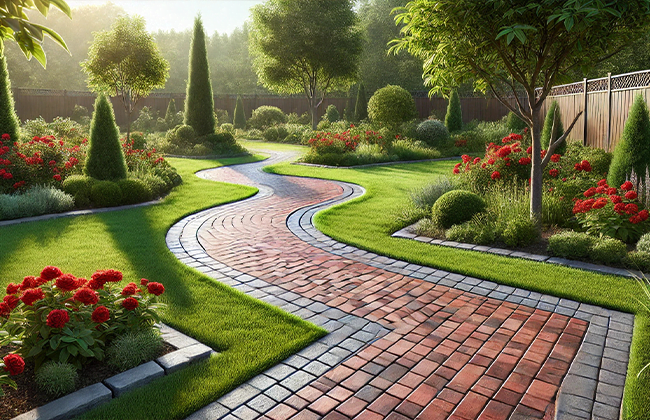
Repairing a brick walkway is essential to maintaining the safety and aesthetics of your outdoor space. Over time, factors such as weather exposure and natural wear can lead to issues like loose bricks and cracked mortar. Addressing these problems not only enhances the walkway’s appearance but also prevents further damage. Whether you’re tackling a small crack or a major overhaul in your repair brick walkway project, understanding the process and choosing the right materials are key to a successful repair.
Decoding Brick Walkway Problems
Before diving into the specific issues your brick walkway might face, it’s essential to understand why and how these problems occur. A brick walkway adds charm and functionality to your outdoor space but is also susceptible to various environmental and structural stresses. Over time, exposure to the elements, fluctuating temperatures, and physical wear can degrade the integrity of the bricks and mortar. Knowing the signs of damage and the underlying causes can help you diagnose issues accurately and plan effective repairs. With this knowledge, you’re better equipped to tackle maintenance proactively, ensuring your walkway remains safe and appealing for years to come.
Causes of Damage
Weather elements like rain, snow, and extreme temperatures are primary culprits behind brick walkway deterioration. Water can seep into brick pores and mortar, freezing during cold weather and expanding to create cracks. Improper installation or subpar materials can also lead to issues sooner than expected. Recognizing that even well-constructed walkways might need repairs due to natural settling and erosion is crucial for ongoing maintenance.
Identifying Problem Areas
Spotting trouble areas early can significantly save effort and expense. Look for signs such as loose bricks, missing mortar, or uneven sections where water pools. Regular inspections, particularly after severe weather events, can help you catch potential problems early. A visual inspection or gentle probing with a tool can reveal less obvious issues beneath the surface, allowing for timely interventions.
In the next section, you’ll learn which types of tools and materials you’ll need for these repairs, ensuring you’re fully prepared to restore your walkway to its best condition.
Tools and Materials Needed for Repair
Repairing a brick walkway isn’t just about hard work; it’s also about having the right tools and materials at your disposal. Let’s dive into what you’ll need to ensure your walkway repair is successful and durable.
List of Essential Tools
You’ll want to gather the following tools before you start:
- Chisel and Hammer: For removing damaged bricks and scraping out old mortar.
- Trowel: Essential for applying new mortar neatly between bricks.
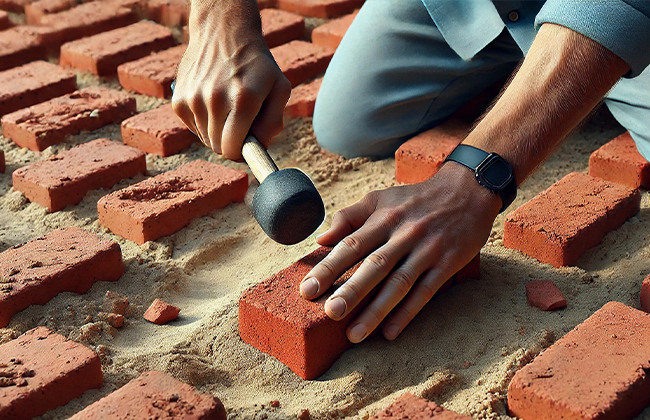
- Rubber Mallet: Useful for tapping new bricks into place without damaging them.
- Level: To ensure that all bricks are uniformly laid and prevent uneven surfaces.
- Broom and Wire Brush: For cleaning out debris and ensuring the base is clean before laying new mortar.
- Measuring Tape: To keep your repairs consistent and ensure each brick fits perfectly.
- Safety Glasses and Gloves: Always prioritize safety to protect against flying debris and rough materials.
Best Materials for Long-Lasting Repairs
Choosing the right materials can make the difference between a repair that lasts a season and one that lasts for years. Here’s what you should look for:
- Mortar Mix: Opt for a high-quality mortar mix that matches the existing mortar in color and composition.
- Bricks: It’s crucial to match the new bricks as closely as possible with the old ones in terms of size, color, and texture.
- Mortar Sealant: Applying sealant over the finished job can help protect the mortar from moisture and wear.
- Sand: A base layer of sand can aid drainage and prevent water from pooling under the bricks.
With these tools and materials, you’re all set to tackle the repair head-on. But remember, the right approach is just as important as the tools you use. Next, we’ll walk you through a step-by-step guide to effectively use these resources, ensuring your walkway is restored beautifully and durably. Let’s get your walkway back in top shape!
Transform your home with expert masonry services. Contact us today for a free consultation.
Step-by-Step Guide to Repairing Your Brick Walkway
Repairing a brick walkway efficiently can enhance both its functionality and aesthetic appeal, ensuring it remains a beautiful and safe part of your outdoor space for years to come. Here’s a detailed guide to help you through each step of the repair process.
Preparation
- Inspect the Walkway: Start by thoroughly inspecting your brick walkway for any signs of damage such as loose bricks, cracks in the mortar, or uneven surfaces. This initial assessment will help you determine the extent of the repairs needed.
- Gather Materials and Tools: Ensure you have all the necessary tools and materials on hand before you begin. This includes bricks, mortar, a chisel, hammer, trowel, level, broom, and safety equipment like gloves and goggles.
- Clear the Area: Remove any debris, plants, or obstacles from the walkway. Use a broom or a leaf blower to ensure the area is clean and clear for repair work.
Removing Damaged or Loose Bricks
- Remove Damaged Bricks: Carefully chisel out damaged or loose bricks without disturbing the intact ones around them. Use a hammer and chisel to gently tap out the bricks and remove any old mortar from the gaps.
- Clean the Base: Once the bricks are removed, clean out the base where they were set. This may involve removing old mortar, dirt, and debris to ensure a clean, stable surface for reinstallation.
Repairing
- Prepare New Mortar: Mix the mortar according to manufacturer instructions. Ensure it matches the color and consistency of the existing mortar for a seamless repair.
- Replace Bricks: Apply a layer of mortar to the cleaned base, then place the new or undamaged brick in the gap. Use a trowel to adjust the amount of mortar to ensure the brick sits level with the others.
- Secure Bricks: Once in place, press down on the brick to embed it into the mortar. Check for level and alignment with adjacent bricks. Tap gently with a rubber mallet if adjustments are needed.
- Fix Loose Bricks: For bricks that have loosened but are not damaged, lift them, clean the area underneath, apply new mortar, and reposition them. Ensure they are firmly pressed into place and level with the surrounding walkway.
Finishing Touches
- Reapply Mortar: Fill any gaps between the bricks with fresh mortar using a trowel. Smooth out the mortar lines for a neat finish.
- Clean Up: Once the mortar is in place, clean off any excess from the bricks with a damp sponge or cloth. This step is crucial for maintaining the walkway’s appearance.
- Allow to Dry: Allow the mortar to set and dry according to the time recommended by the mortar manufacturer, usually 24-48 hours, before walking on the walkway.
- Sealing the Walkway: After the mortar has fully cured, consider sealing the walkway with a suitable sealant. This will protect the mortar and bricks from moisture and wear, extending the life of your walkway.
By following these steps, you can ensure a thorough and lasting repair of your brick walkway, restoring its beauty and functionality. Regular maintenance and prompt repairs can prevent larger issues down the line, keeping your walkway welcoming and safe for everyone. Next, we’ll explore preventative measures to maintain your brick walkway in top condition year-round, helping you minimize future repair needs and extend the life of your walkway.
Preventative Measures for Brick Walkway Maintenance
Maintaining your brick walkway not only keeps it looking great but also extends its lifespan, preventing the need for frequent repairs. Let’s explore some effective preventative measures that can help you achieve this.
Routine Inspection Tips
- Regular Checks: Conduct seasonal inspections of your walkway, especially after harsh weather conditions like heavy rain, snow, or extreme heat, which can accelerate wear and tear. Look for signs of cracking, shifting, or erosion in the mortar and bricks.
- Immediate Action: If you notice any issues during your inspections, address them promptly. Small repairs like repositioning a loose brick or refilling a bit of eroded mortar can prevent more significant problems later.
- Clean Regularly: Keep the walkway free from debris, such as leaves, twigs, and dirt. These materials can retain moisture against the bricks and mortar, potentially causing damage over time.
Preventative Treatments and Solutions
- Sealing: Consider applying a sealant to your brick walkway every few years. Sealants help repel water, resist stains, and reduce wear, providing an additional layer of protection against the elements.
- Weed Control: Weeds can grow between bricks and displace the mortar, destabilizing the structure. Regularly remove weeds and consider using a natural or chemical herbicide to keep them from coming back.
- Proper Drainage: Ensure that your walkway has adequate drainage to prevent water accumulation. Pooled water can seep into the bricks and mortar, causing them to deteriorate faster.
By implementing these preventative measures, you can maintain the integrity and aesthetics of your brick walkway, reducing the need for repairs and prolonging its durability. Regular care and attention will keep your walkway safe and inviting, enhancing the overall appeal of your outdoor space.
Next, we’ll explore the differences between handling repairs yourself and opting for professional assistance. This discussion will help you determine the best approach for your situation, whether you’re an avid DIYer or prefer professional help. Understanding the pros and cons of each option is crucial for guiding your maintenance strategy effectively.
Professional vs. DIY Brick Walkway Repair
Deciding whether to repair your brick walkway yourself or call in a professional can be a significant decision. Each option has its merits, depending on the complexity of the task, your skills, and the time you can dedicate to the project.
When to Call a Professional
- Extensive Damage: If the damage to your walkway is extensive or the structure is compromised, it’s best to consult a professional. They have the tools, skills, and knowledge to handle complex repairs that might be beyond the scope of typical DIY methods.
- Lack of Tools: Professional repairs might also be necessary if you don’t have the necessary tools and materials. Professionals come equipped with everything needed, saving you time and possibly money on buying or renting equipment.
- Guarantee of Work: Most professionals will offer a warranty on their work, providing peace of mind that you won’t get from a DIY repair. If something goes wrong, they’ll return to fix it at no extra charge.
DIY Repair Tips and Safety Advice
- Educate Yourself: Before you start any DIY repair, make sure you understand the process thoroughly. There are plenty of resources online, including videos and tutorials, that can guide you.
- Gather the Right Materials: Use only materials suitable for outdoor use and compatible with your existing walkway. This ensures durability and maintains the aesthetic of your walkway.
- Safety First: Always wear the appropriate safety gear, such as gloves, goggles, and protective clothing. Ensure your work area is safe and secure, especially if you’re using power tools.
- Measure Twice, Repair Once: Take accurate measurements and carefully plan your repairs. This precision will prevent errors and save you from doing the same job twice.
By weighing these factors, you can decide whether a DIY approach or professional help is better for your situation. If you choose to do it yourself, take it slow and steady to ensure the best results.
By understanding the advantages and challenges of both professional and DIY approaches, you can better gauge which option aligns with your needs and budget. We’ll delve into the financial aspects of each route, examining common expenses such as materials and labor. This insight will help you estimate the overall costs you might incur, regardless of whether you opt for a DIY project or professional services. This information is crucial for making a well-informed decision that ensures both quality repairs and financial efficiency.
Transform your home with expert masonry services. Contact us today for a free consultation.
Cost Analysis of Brick Walkway Repair
When considering whether to undertake a DIY project or hire a professional for your brick walkway repair, understanding the potential costs involved is crucial. This section will provide a detailed cost comparison and some tips on how to budget for your repair project effectively.
Cost Comparison: DIY vs. Professional Repair
To help you make an informed decision, let’s break down the typical costs associated with both DIY and professional repairs. Below is a table that summarizes the average expenses you might encounter:
| Expense Category | DIY Cost | Professional Cost |
| Materials (bricks, mortar, sealant) | $50 – $100 | Included in service |
| Tools Rental (if needed) | $30 – $50 per day | Not applicable |
| Labor | $0 (Your time) | $200 – $400 |
| Miscellaneous (safety gear, cleaning supplies) | $20 – $30 | Included in service |
| Total Estimated Cost | $100 – $180 | $200 – $400 |
Note: Costs can vary based on the scope of the project and regional price differences.
Budgeting for Your Repair Project
- Assess the Scope: Begin by determining the extent of the damage. This will help you estimate the amount of materials and time needed, which are critical components of your budget.
- Shop Around for Materials: If you choose the DIY route, look for the best prices on materials. Sometimes, local hardware stores offer competitive prices or discounts on bulk purchases.
- Consider Hidden Costs: Remember to account for potential hidden costs such as tool rental or additional materials if the project expands beyond initial estimates.
- Time Investment: Consider your time as a valuable resource. If the repair takes longer than expected, it could impact your schedule, which is an indirect cost to consider.
- Get Multiple Quotes: If you opt for professional repair, it’s wise to get quotes from several contractors to ensure you’re getting a fair price.
Understanding these costs will help you manage your budget more effectively, ensuring that whether you choose a DIY fix or a professional repair, you are prepared financially. Careful planning and budgeting are key to a successful repair project without unwanted financial surprises.
Managing these costs effectively ensures that whether you opt for a DIY fix or professional repair, you’re financially prepared. Good planning and budgeting are crucial for a successful repair project without unexpected financial burdens. With ongoing innovations in repair techniques and materials, you have access to a range of options that can enhance the efficiency and effectiveness of your repairs, potentially saving time and money. These innovations, which we will delve into next, offer promising new approaches to brick walkway maintenance and repair.
Advancements in Brick Walkway Repair Techniques
As we continue to see improvements in construction and repair methodologies, staying informed about the latest advancements can help you maintain your brick walkway with greater efficiency and effectiveness. Here, we’ll explore some of the modern methods and innovative materials that are transforming the way we approach brick walkway repairs.
Modern Methods and Materials
- Polymer-Modified Mortars: These are a game-changer in masonry repair. Polymer-modified mortars have improved adhesion and durability compared to traditional mortars, making them ideal for repairing walkways that endure frequent foot traffic and harsh weather conditions. They cure faster and can be more flexible, reducing the likelihood of future cracks.
- Laser Leveling: The use of laser technology for leveling has become more prevalent in ensuring that the bricks align perfectly throughout the walkway. This method not only speeds up the alignment process but also enhances precision, which is crucial for a uniform and stable surface.
- Water-Repellent Coatings: Applying water-repellent coatings to brick walkways is becoming a popular preventative measure. These coatings help repel water and stains, protecting the brick and mortar from moisture-related damage and reducing maintenance needs.
Innovations in Brick Repair Technology
- Brick Stabilization Techniques: New stabilization methods, such as the injection of specialized resins into the base and substrate of the walkway, have been developed to provide a more stable foundation for loose bricks without complete disassembly.
- Color-Matched and Composite Bricks: Advances in brick manufacturing have led to the creation of composite bricks that are not only stronger but also better at matching the color and texture of existing bricks. This makes repairs less noticeable and maintains the aesthetic integrity of the walkway.
- Thermal Imaging for Diagnosis: Thermal imaging technology is now used to detect subsurface problems that are not visible to the naked eye, such as hidden cracks or moisture accumulation. This technology allows for targeted repairs that address underlying issues before they become major.
These advancements in brick walkway repair techniques not only make the process more efficient but also extend the lifespan of your walkway, ensuring it remains functional and attractive for years to come. By incorporating these modern methods and innovative materials, you can take your maintenance and repair efforts to the next level, ensuring your walkway always looks its best and stands up to the elements effectively.
Conclusion
After exploring the various techniques and materials for repairing brick walkways, it’s clear that both traditional and modern methods have their advantages. Whether you choose DIY repairs or professional services, using the right approach and materials is crucial for a lasting repair. If you are looking for a professional contractor to repair your brick walkway, contact us at (+1) 917-355-8556 for expert assistance. With the right help, your brick walkway can regain its beauty and functionality, ensuring it remains a durable and attractive part of your home.
FAQs
Q: What should I check for when inspecting my repair brick walkway?
A: Inspect for uneven surfaces, loose bricks, and cracks in the mortar. Early detection can make your repair brick walkway project easier and prevent minor issues from worsening.
Q: How often should I perform maintenance on my brick walkway?
A: Regular maintenance should be done annually, or more frequently if your area experiences severe weather, to ensure your repair brick walkway remains in top condition.
Q: What is the best time of year to repair a brick walkway?
A: Spring or early fall is ideal for repairing a brick walkway, as mild temperatures and dry weather make the materials easier to handle and cure.
Q: Can I repair brick walkway damage myself or should I hire a professional?
A: Minor repairs like fixing loose bricks can be a DIY project. For extensive damage or structural repairs, it’s wise to contact a professional to repair your brick walkway.
Q: What are the signs that my brick walkway needs immediate repair?
A: Significant unevenness, widespread loose bricks, and large cracks are urgent signs. You should repair your brick walkway to avoid hazards and further deterioration.
Q: How do you make a brick walkway look new?
A: To make a brick walkway look new, thoroughly clean the bricks using a pressure washer. Alternatively, use a brush with soapy water. Replace any damaged or loose bricks. Apply a sealant to enhance the color and protect the surface.
Q: How much does it cost to redo a brick walkway?
A: Redoing a brick walkway can cost between $10 to $30 per square foot, depending on the type of bricks used and the complexity of the design.
Q: Should you put sand in a brick walkway?
A: Yes, using sand in the joints of a brick walkway helps lock the bricks in place and prevents them from shifting.
Q: How to relevel a paver walkway?
A: To relevel a paver walkway, remove the pavers, level the underlying sand base with a straight board, and then carefully replace the pavers.
Q: How to fill cracks in a brick walkway?
A: Fill cracks in a brick walkway by clearing out debris from the cracks and applying a polymeric sand or mortar mix, then misting lightly to set.
Q: How do you fix outside bricks?
A: Fix outside brick by removing damaged bricks and cleaning the area. Replace them with new bricks matched for color and size. Use mortar to secure them in place.
Q: What is the best base for a brick walkway?
A: A compacted gravel base topped with sand is the best foundation for a brick walkway, providing stability and drainage.
Q: Does a brick walkway need mortar?
A: While some brick walkways can be set in sand, using mortar provides a more stable solution. This is especially true in areas with heavy traffic or extreme weather.
Q: Can I just lay pavers on dirt?
A: Laying pavers directly on dirt is not recommended as they can sink or shift. Preparing a proper base of compacted gravel and sand is essential for stability.
Q: What is the best filler for brick walkways?
A: Polymeric sand is the best filler for brick walkways as it binds bricks together securely and prevents weeds and pests from infiltrating.
Q: How to fill gaps in a brick path?
A: To fill gaps in a brick path, use polymeric sand. Spread it over the path, sweep it into the gaps, and then gently mist with water to set.
Q: How do you stabilize a brick walkway?
A: Stabilize a brick walkway by ensuring a properly compacted base. Use edge restraints and fill joints with polymeric sand. This will lock the bricks in place.
Q: Can I use regular brick for a walkway?
A: Regular bricks can be used for walkways, but they are less durable than paving bricks designed for ground contact and heavy foot traffic.
Q: Should I seal my brick walkway?
A: Sealing a brick walkway is recommended to protect against moisture, stains, and weather damage, extending the lifespan of the walkway.
Q: What do you put between bricks on a walkway?
A: Polymeric sand is typically used between bricks on a walkway to provide a firm hold and prevent weed growth and erosion.
Q: How do you stabilize crumbling bricks?
A: Stabilize crumbling bricks by removing any loose material. Apply a bonding agent, then fill with a mortar mix. Use this mix for historic restoration if necessary.
Q: What to use for loose bricks?
A: For loose bricks, remove them, clean the area, reapply mortar, and replace the bricks, ensuring they are firmly set in place.
Transform your home with expert masonry services. Contact us today for a free consultation.


