 ChatGPT
 Perplexity
 Google AI
 Claude

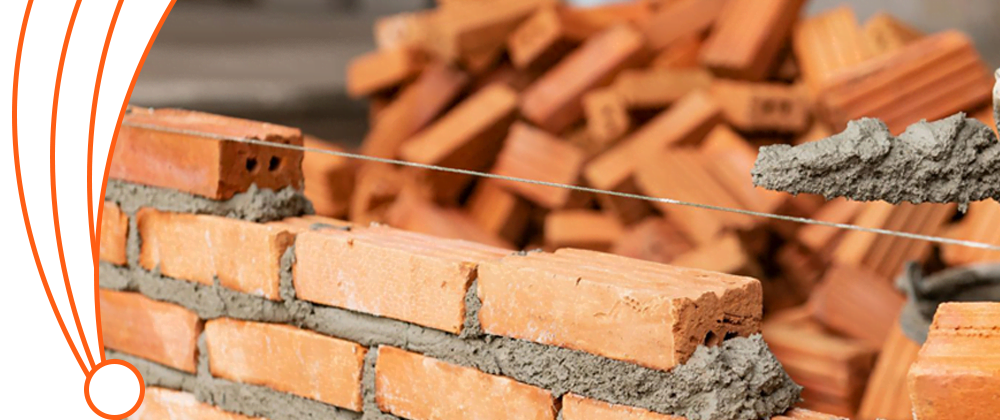
Brickwork repointing presents no severe difficulty, although successful execution needs appropriate techniques, tools, and adequate time to maintain quality results. The goal of repointing brickwork includes removing mortar from deteriorated areas while safeguarding bricks and then mixing new mortar properly before applying it to cleaned interfaces.
Treatment precision matters since improper mortar mix and uneven application weaken structure durability and appearance. People with masonry experience can handle the task, but new starters might struggle to meet those requirements.
Whether achieved by experienced persons through proper methodology and correct materials or not achieved without professional assistance, the result will be durable with visual consistency.
Key Considerations Before Starting Brick Repointing
The fundamental knowledge of repointing aspects makes the work more organized and effective. A step-by-step breakdown follows to lead you through mortar repair work.
Purpose of Repointing
The main goal of repointing is to restore the wall’s structural stability and protect it from moisture damage. Mortar joints are the first barrier for the water, so if present Mortar has worn out then it must be replaced with new mortar in order to avoid leakages and cracks in structures.
Inspecting the Structure
Start by checking the condition of the mortar and bricks. Look for signs of crumbling, gaps, or cracks in the joints. If there are some damaged bricks, then probably both the bricks and the mortar will have to be removed.
Tools and Materials
To repoint you will need equipment such as a grinder that will help you to remove the old mortar, a chisel for particularly precise work, and a brick pointing trowel to apply the new mortar. Pay special attention to the mortar colour, granularity and composition in order to have the new mortar resemble the old mortar.
Preparation Work
Carefully remove the old mortar to about ½ to 1-inch depth from the joints. This ensures the new mortar has enough space to bond effectively. Clean out all the dust and debris from the joints before applying the new mortar.
Applying New Mortar
Mix the mortar according to the manufacturer’s instructions. Fill the joints completely with the new mortar, compacting it properly to avoid air pockets. Use the trowel to smooth and shape the joints, so they blend seamlessly with the existing structure.

Curing the Mortar
Mortar needs time to cure properly. Mistreat the area with water if necessary to keep it slightly damp during this process. It is imperative to ensure the fresh mortar is not exposed to rain or direct sunlight or is frozen before it sets.
When to Call a Professional
Categorized into three levels of difficulty, it may be again reiterated that professional mason should be sought if the repointing project area is vast, structure historical, or design intricate. They have the capabilities to win these challenges and achieve the best results.
Can I Repoint Brick Myself?
You can repoint brick yourself if you have the right tools, patience, and basic masonry skills. Repointing involves removing damaged mortar from brick joints and replacing it with fresh mortar to restore strength and prevent water damage. While the process is straightforward, it requires precision to avoid damaging the bricks or creating uneven joints. Key steps include:
- Preparation: Gather tools like a chisel, grinder, and trowel, and ensure the new mortar matches the original color and composition.
- Removing Old Mortar: Carefully remove loose or crumbling mortar to a depth of ½ to 1 inch.
- Applying New Mortar: Fill joints with fresh mortar, compacting them for a secure bond and shaping them for a consistent finish.
- Curing: Allow the mortar to set slowly, protecting it from extreme weather.
What Are The Problems With Repointing?
If repointing brickwork is done in the wrong way, several issues arise that affect the stability and aesthetic value of a building. Key issues include:
Damage to Bricks
- Sandblasters and other abrasive tools can also cause bricks to chip, crack, or become weak, particularly in older structures.
Incompatible Mortar
- Mismatched mortar in strength, composition, or color can cause bonding issues, cracking, or moisture trapping, accelerating deterioration.
Poor Mortar Removal
- Insufficient removal of old mortar (less than ½ inch) can prevent proper bonding of the new mortar, leading to weak joints.
Uneven Application
- Proper distribution of the mortar is another issue: the areas where the mortar was applied thinly look visually inconsistent, as well as weaken the joint’s integrity and its ability to repel weather conditions.
Improper Curing
- Allowing mortar to dry too quickly or exposing it to extreme weather can result in cracks or weakened joints.
Neglecting Structural Issues
- Mortar pointing without fixing some issues like; cracked bricks or leaking water may only guarantee a short solution.
Over-Grinding Joints
- Over-widening joints during mortar removal can change the structure’s look and reduce its overall stability.
Wherever you are, Sardar Restoration Corp’s services are tailored to meet local needs. Contact us today at (+1) 917-355-8556 or sardarrestoration@gmail.com, or visit us at 2770 Fish Ave, Bronx, NY 10469, United States. Let us bring excellence to your next project!
FAQs
Can I repoint brick without professional help?
Yes, but it requires patience, precision, and the right tools. Mistakes in mortar removal or application can weaken the structure or cause aesthetic issues.
What is the hardest part of repointing brickwork?
The most challenging aspects include:
- Removing old mortar without damaging the bricks
- Ensuring proper bonding of new mortar
- Achieving a consistent finish across all joints
- Avoiding excessive moisture absorption that leads to weak mortar
How long does DIY brick repointing take?
Small repointing projects may take a few hours, but larger areas can require several days. Drying time also affects the overall duration.
What are the risks of improper repointing?
Poorly done repointing can lead to weak joints, moisture penetration, structural damage, and mismatched mortar that affects the building’s aesthetics.