 ChatGPT
 Perplexity
 Google AI
 Claude

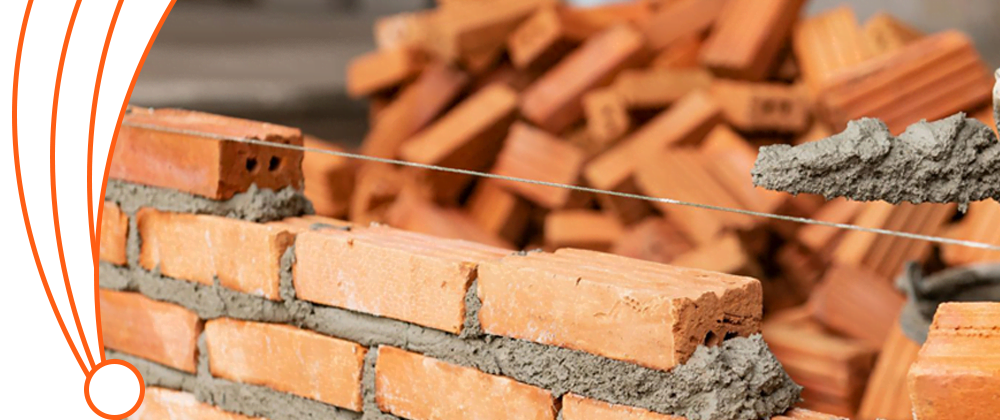
Flush pointing is a finishing technique used in masonry to fill and smoothen the joints between bricks or stones so they are level with the masonry surface. This method enhances the structure’s aesthetic appeal and durability, making it a popular choice in modern construction. It’s particularly favored for its clean and straightforward appearance.
Flush Pointing Technique
Flush pointing is a masonry technique where the mortar is applied evenly with the surface of the brick or stone, creating a smooth, sealed finish. This method prevents water infiltration, improves the structure’s weather resistance, and extends the lifespan of the masonry.
— Sardar Restoration Corp
Why Use Flush Pointing in Masonry?
In masonry construction, flush pointing plays functional and decorative roles. This method includes pointing and trowelling so that the mortar joints are uniformly filled and levelled with the brick or stone surface.
Here are the detailed reasons why flush pointing is widely used in masonry:
Enhanced Durability and Weather Resistance
Flushing pointing is one of the most preferred techniques since it enhances the durability of masonry structures. When properly applied, flush pointing protects the joints between bricks or stones, contrary to water penetration into the walls. This is particularly important in climates where moisture can cause significant damage, such as freeze-thaw cycles, leading to cracking and erosion. The flush mortar joints help direct water away from the masonry surface, reducing the risk of water penetration, damp issues, and structural damage over time.
For a deeper look at how flush pointing maintains its strength over time and adapts to harsh environments, see how durable flush pointing really is.
Aesthetic Appeal
Flush pointing gives the wall a neat and regular finish because the faces of the mortar joints are even with the masonry. This finish is plain and minimalist and is perfect for most modern architecture and interior design. It is usually adopted if the aim is to produce a fine finish between the brick or stones and the mortar to the structure. The uniformity in joint lines makes the masonry look more polished and professional, which is essential in residential and commercial construction.
Easy Maintenance
With flush pointing, the joints are less likely to trap dirt, grime, or debris, as the smooth surface doesn’t have the nooks and crannies typical of more textured pointing methods. This renders cleaning easier and less time-consuming, particularly in exterior walls that may be affected by all weathers. In addition, if there is little or no protruding mortar, there will be a slight chance that the joints will be eroded or affected by weather conditions.
Improved Insulation
At the same time, adequately applied flush pointing also improves the structure’s insulation. One can play the role of insulation since the joints between the stones or the bricks are usually tiny and close together. However, as a passing remark, stability is not the intention of flush pointing, but its contribution towards the overall goal of a building cannot be gained.
For a more detailed look at how flush pointing affects your building’s energy performance, see how it helps improve energy efficiency across residential and commercial properties.
Prevents Structural Issues
Over time, poorly maintained or ineffective pointing can allow water ingress into the masonry. This may lead to mold, mildew, or structural issues as the mortar breaks down and weakens. Flush pointing does this by forcing tight closure of the mortar joints, which increases the lifespan of the masonry and minimizes the repair intervals.
Cost-Effectiveness
Flush pointing is relatively cheap compared to other complex masonry working methods. Although it can employ professional personnel for its application, the materials involved are easy and cheap to acquire, so it can be considered an effective technique in attaining the best finish. In the long run, it also ensures that the properties it is used on do not have to be fixed as often, hence saving property owners money.
While flush pointing is often seen in older masonry, it is also a reliable choice for newer designs. Learn more about the role of flush pointing in modern construction and how it supports today’s architectural needs.
How Is Flush Pointing Done Step By Step?
Flush pointing is a systematic approach that helps to make good mortar joints with tolerance in terms of strength and beauty in quality. Here is a step-by-step procedure on how flush pointing can be implemented:
Preparation of the Masonry Surface
- Clean the Joints: Use a wire brush or a chisel to remove loose mortar, dirt, or debris from the joints. This ensures proper adhesion of the new mortar.
- Wet the Surface: Lightly dampen the joints with water to prevent the dry bricks or stones from absorbing moisture from the new mortar too quickly, which can weaken the bond. However, avoid over-saturating the masonry.
Mixing the Mortar
- Select the Right Mortar Mix: Use a mortar compatible with the type of masonry (e.g., cement-lime mortar for most bricks). The mix should be of appropriate strength to avoid cracking or compatibility issues.
- Prepare the Mortar: Mix the mortar to a workable consistency. It should be neither too wet nor too dry—aim for a consistency that can be easily applied but will hold its shape in the joint.

Applying the Mortar to the Joints
- Load the Trowel: Scoop a small mortar onto a pointing trowel or a hawk.
- Press Mortar into the Joint: Tightly press the mortar into the cleaned joints using a smaller pointing tool or the edge of the trowel. Ensure there are no air pockets or gaps, as these can weaken the joint.
- Work in Small Sections: Work on one section at a time to maintain control over the application and finish.
Leveling the Mortar
- Strike Off Excess Mortar: Using the trowel’s edge, remove mortar from the surface against the face of the masonry. It is essential to ensure that you accomplish flush-pointing work, resulting in a smooth and leveled surface.
- Smooth the Joint: If necessary, a fine finishing tool, the jointing tool, is used to level the face and match it with the brick/stone face. This also compacts the mortar and helps it gain better working and weather resistance.
Cleaning the Surface
- Remove Mortar Residue: After applying and smoothing the mortar, remove any excess mortar from the brick or stone surface using a damp cloth or sponge. Be gentle to avoid smearing the fresh mortar in the joints.
- Final Cleaning: Once the mortar begins to set (but is not fully hardened), lightly brush the surface with a soft brush to remove any remaining residue and ensure a clean finish.
Curing the Mortar
- Protect from Rapid Drying: When the masonry work is completed, it is recommended that the surface is covered with damp burlap or plastic sheets so that the mortar will cure slowly while retaining moisture. This minimizes cracking, which tends to result from rapid drying of the structure.
- Allow Proper Curing Time: Depending on the variety used in the mortar, the curing process may take 1- 3 days. To set it correctly, you should not tamper with the joints when the mixture is wet.
Inspection and Touch-Up
- Check for Gaps or Cracks: Once the mortar has fully cured, inspect the joints for any inconsistencies. If that is the case, fine the joints by applying the mortar where it may have settled and cracked while curing.
- Final Cleaning: Clean up the complete surface to eliminate any remaining blotches or discolorations of the mortar or dirt.
What Are The Advantages And Disadvantages Of Flush Pointing?
Flush pointing is another regular procedure in the construction of projects involving bricks or stone mortar joints. Despite its advantages, flush pointing has several disadvantages that should be considered based on the project’s characteristics. The following is a comprehensive analysis of the pros and cons that those favoring using it must consider.
| Aspect | Advantages | Disadvantages |
|---|---|---|
| Weather Resistance | Prevents water accumulation in joints. | Limited drainage for vertical surfaces; may hold water in heavy rain. |
| Durability | Protects masonry from erosion caused by wind and rain. | Susceptible to cracking in climates with extreme temperature fluctuations. |
| Aesthetic Appeal | Provides a clean, smooth, and uniform appearance. | Lacks the decorative charm of other pointing methods like tuck or weathered pointing. |
| Maintenance | Smooth surface is easy to clean; reduces dirt and debris buildup. | May require periodic cleaning in polluted or harsh environments to maintain appearance. |
| Cost-Effectiveness | Simple and economical compared to intricate methods. | Poor application or improper curing can lead to defects, requiring rework. |
| Structural Integrity | Tight joints enhance stability and reduce the risk of mortar detachment. | Improper application or curing can compromise joint strength over time. |
| Labor Requirements | Does not require elaborate tools; suitable for general masonry finishes. | Achieving a truly smooth finish demands skilled labor and precision. |
How Does Flush Pointing Prevent Water Accumulation?
Flush pointing reduces water content by ensuring a smooth surface with the top of the mortar being at par with the masonry face. This design avoids the formation of any pockets or slots or crevices where water could be harbored but instead directs water off the whole surface. With flush pointing, surfaces are tightly closed, thereby denying water a chance to get through the joints. In fact, many homeowners trust this process as a practical way to stop moisture from entering through masonry and weakening the structure, especially in older properties. Hence, there is no internal moisture, dampness, or freeze-thaw cracking, which is common where the climate is cold.
This technique improves the look of your brick joints and helps resist water intrusion caused by rain, snow, or freezing temperatures. Learn more about what types of properties need flush pointing and how different buildings benefit from this technique.
Besides, the flowing finish reduces the chances that stains, dirt, and other debris will accumulate at certain points, restricting the free flow of water. Therefore, flush pointing contributes to improved performance in the weather bar and, hence, increases the lifespan of the masonry structures.
Why Choose Sardar Restoration Corp For Brick Pointing, Repointing And Flush Pointing?
For brick pointing, repointing, or flush pointing, we recommend Sardar Restoration Corp because our team specializes in masonry services. All our experts have years of experience undertaking both residential and commercial projects, with an emphasis on restoring and maintaining the performance of brickwork.
A talented team of specialists uses reliable, strong materials and methods to provide wear-resistant coatings. Our brick pointing and re-pointing work can renew old mortar, use flush pointing to give a smooth appearance or deal with certain structural requirements with precision and accuracy. Our team is always ready to provide a free estimate of your project, either of brick pointing, repointing cost or flush pointing.
We are ready to help you prolong your life and improve the looks of your masonry with expert stonework.
Wherever you are, our services are available to meet your local needs. Contact us today at (+1) 917-355-8556 or sardarrestoration@gmail.com, or visit us at 2770 Fish Ave, Bronx, NY 10469, United States. Let us bring excellence to your next project!
FAQs
How does flush pointing compare to other pointing techniques?
Unlike recessed or weather struck pointing, flush pointing aligns the mortar flush with the brick, offering a clean look and better protection against moisture and debris.
What maintenance is required for flush pointing?
Maintaining flush pointing involves regular inspections for damage, gentle cleaning to remove build-up, and timely repairs to preserve its protective qualities and appearance.
When should I consider flush pointing for my property?
Consider flush pointing for a durable, aesthetically pleasing finish. It protects against weather elements, especially in climates prone to heavy rain or frost.
What is flush or weathered pointing?
Flush pointing involves finishing the mortar flush with the bricks for a smooth look. Weathered pointing slopes the mortar away from the bricks to shed water effectively, helping prevent moisture retention.
How do you do flush pointing?
Flush pointing is done by applying mortar to the joints between bricks or stones and then finishing it level with the surface of the masonry. It requires careful preparation of the mortar and precise application to ensure a smooth, protective finish.